Two Rudall patent head repair questions

I know that patent head repairs have been discussed here before; please excuse me for bringing this perennial subject up again!

Back in the early 1980’s I bought a patent head Rudall from the late Jim Howarth. He said that it had been in the family since his father George, who had apprenticed with Liddle in 1874.
There was a hairline crack through the embouchure, which we filled temporarily in hopes that better glues would be forthcomming. Frankie Gavin bought the flute, and I believe he only recently sold it.

The headjoint leaked, although not through the embouchure crack. Jim Howarth, who was in his eighties at the time, took it into his shop, which was dominated by a treadle lathe with full overhead mechanism, and a few tone hole cutters from Rose himself. He poured “paraffin” into the headjoint to seal the spaces between the tubes. Miraculously, this seemed to work. It also did not smell like kerosene.

We have another Rudall here now in for repairs with a leaky patent head. I am loath to pour kerosene into it. Does anyone have a suggestion for a viscous yet food-quality lubricant? I really do not want to dismantle this head.

We have yet another patent head Rudall here now as well, this one with a nasty embouchure crack (illustrated at: http://www.antiqueflutes.com/cgi-bin/catalog.cgi?snum=932).
Back in the early 1980’s I bought a solid ivory Prowse with an embouchure crack. We pulled the tube and closed the crack, then bored out the joint to refit the tube. I sold this flute to Paul Davies. Later we were discussing things, and I mentioned our repair. Paul got very excited, because the usual thin Prowse sound was even thinner with the smaller embouchure wall. This was especially acute, since the flute was a show-stopper, and would be embarrassing at a session with such a virile body and limp tone. Neither of us ever used this technique again, as far as I know.

Over the years we have tried sanding out the non-embouchure part of bores, but this never seemed acceptable.

Steaming has not been attractive to us, so last spring we tried putting an old cocus headjoint with an embouchure crack into a jar of linseed oil. We have clamped it, and not clamped it. There has been absolutely no movement of the crack in six months of immersion.

Does anyone have any other ideas?

Many thanks!

David
http://www.antiqueflutes.com

The only way is to repair it properly.
The head has to be fully dismantled, the bore has to be sanded to except the liner without pressure. Then the Patent head needs to be reassembled and greased. Any other approach is a waste of time.

sorry david, i can’t help you with the material, but i know there is a flexible crazyglue…
i’m interested in the chimney depth issue, i thought that pulling the slide out, gluing, re-boring…will give the original chimney depth?
e.

I’ve heard of where the liner and the wood were not sealed completely and it caused the tone to weaken.

I don’t see how chimney height would be affected. The ID of the liner is the the same and the outside of the wood is the same.

Best, d

They are referring to boring out the head to compensate for the shrinkage of the wood, which is usually about 1-1.5mm. there are usually two things going on, shrinkage and the bore ovulating because of the grain pressure. The best way I have found is to sand the bore avoiding the embouchure side, to keep from loosing any more chimney depth, also if the bore is out of round, that can be sanded to make the sleeve fit better. Anything less then this, pinning or gluing, is just a temporary fix, as the pressure is still present. I have seen a lot of pinned cracks either reopen, or get additional cracks next to the pinning.
If the crack is not through the embouchure hole, it is possible to graft new wood in the crack to regain the original diameter, but when it goes through the embouchure this becomes problematic. I guess you could close the crack at the embouchure, then slot cut the back of the head and graft in new wood…
Good luck!

:smiley: thanks Jon

that’s a much more complete description.

I’ve known some ovulating bores with infertile imaginations.

Thank you for responding to my query!

One of the issues here is the problem of leakage between the embouchure and the metal lining. When a flute cracks anywhere on the head, the internal diameter of the wood tube-bore expands, often creating a gap between the wood and the metal sleeve at the blowhole. Since the tone of a flute depends on complete airtightness from the headcork to the active tonehole, any leak weakens the tone. Leaking at the embouchure is common, and nasty. In a pinch one can apply beeswax inside the embouchure, but we almost always use superglue. Just remember to blow, not suck, into the head to spread the glue into the gap, and have q-tips and acetone handy.

The embouchure wall height has always been a crucial component of any flute. The cylindrical renaissance flutes often had small bulges at the embouchure to give a bit of extra height, and the practice continues. By boring out the inside of the headjoint, the wood removed necessarily diminishes the height of the embouchure wall.

Several technicians, especially Jon and Patrick, speak of sanding down the bore away from the embouchure area. This sounds good, but must leave the bore with an asymmetrical hole, exacerbating any ovulation (thanks for this new addition to flute lexicography, Jon!). I am curious to hear how successful this has been.

Jon mentions the possibility of closing an embouchure crack and then cutting the headjoint on the far side, creating an easily filled gap. This also has appeal, but we have never had the balls to try it out.

Methods of re-hydrating the wood, such as steaming, soaking in water or linseed oil, etc. seem never to work. I have seen flutes soaked overnight in linseed oil only to have freaked out by morning, expanding hugely in all the wrong directions. Hence our attempts to control the expansion. We use hose clamps with cork linings gapped to miss the crack areas when glueing, and tried these on a head soaking in linseed oil. As I mentioned earlier, so far six months of soaking has not done what we had hoped.

I agree with Jon that our headjoint with the embouchure crack needs to be dismantled for any crack repair, especially with the patent mechanism.

It is the headjoint without the crack that I hope not to have to dismantle. There are three screws holding the patent head together under the crown which are generally ground down by the maker so the crown can turn. These need to have new slots cut into them for removal. I hate to take cutting tools to such a magnificent piece of history, unless absolutely necessary. On this flute the air leaks out between the sliding tubes I believe, so I am seeking a liquid lubricant that will leave lubricant where we want it, namely between the tubes, without harming anything else. Any ideas?

Successful and long lasting embouchure crack repairs are the holy grail of restorationists; long sought and rarely found. I am curious about the forced ovulation technique. Do you glue the tube back in with epoxy, so that there is a constant connection twixt wood and metal? Absent a round bore, is the flute’s playability and resonance affected by gaps, thus hindering the full vibration of the flute tube?

I am also curious about technique. Do you hand-sand with a papered dowell, or use a lathe? How do you control symmetry as much as possible? Thank you very much for sharing your findings!

All the very best,

David

Just send it to Jon. :slight_smile:

I had a go on a patent head RR that just had just finished fully restoring. It looked and played factory fresh.

That particular flute is one of the best I’ve ever seen come though his shop and I have been luck to play.

Certainly in a PH crack repair one would not wish to remove any (more) chimney depth from an embouchure whose wooden walls are already about 1/3 shallower than “normal” heads because of the double metal liner and cut-out in the inner one which provides a window for the the hole to move along as the mechanism telescopes. In normal, single-lined heads, I don’t think the loss of chimney depth even with a concentric re-bore is necessarily all that much or that serious.

Of course, much depends on just how much the wood has shrunk and so how much bore enlargement is needed. I think a case-by-case assessment would be needed. Most of the “normal” heads I have fixed cracks on have not needed all that much bore enlargement to readmit the liner tube. I don’t have a lathe, so I have to do it with files/dowel and sandpaper, and I do try to do it eccentrically, away from the embouchure, but I don’t think I have yet noticeably-to-the-eye ovalised (Jon can keep his eggs! :wink:) a head bore, nor lost as much as the thickness of the liner tube wall in the depth of an embouchure.

I can’t see much point in trying to rehydrate the wood - any restoration of its original volume and configurations by such forced methods would inevitably be temporary and not conducive to or contributory towards a stable outcome. That said, I have found steam useful as a reforming method where a cracked wooden part had become seriously distorted, such that one could not simply close the crack up - neither force it fully back together nor get its edges aligned correctly! (See this photo album.) I was amazed how well and readily the cocus responded to steam!

As for maintenance lubrication of a PH:
David, sometimes (as I accidentally found once, to my initial dismay as you may imagine!) it may be possible to partially disassemble a PH without needing to remove those screws you mention or the lynch pin - certainly sufficiently to apply a decent sealing lubricant between the tubes. My own PH did this to me! I have since done it deliberately several times when it started to leak air between the tubes or around the stopper. I’ve just done it again to take some photos for this thread. I should emphasise there is nothing broken in my PH (barrel cracks only) and the only thing missing is the original silver face-plate, which would have been soft-soldered onto the traveller. Paul Davies’ replacement is simply push-held in place with beeswax (one would have to renew the cork lapping if one tried to solder it onto the traveller).

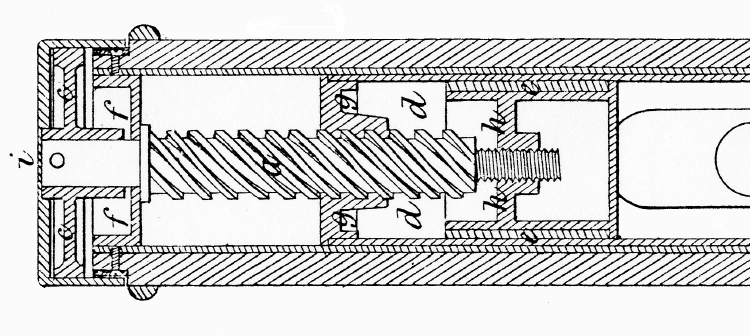
First nearly fully extend the tuning mechanism - wind it out until it stops, then take it back a few turns. Then insert a thick dowel with a slightly hollowed end (Paul Davies made my such a thing for inserting his replacement for the missing stopper face-plate of my PH - my flute came from him) - or maybe with a rubber pad securely stuck to it for better traction - up the head and press it against the stopper, then screw it around (anticlockwise looking from the barrel end), trying by friction to screw the stopper off the end of the mechanism’s spindle. There is no limiter holding it on. Screw the stopper around, then gently extend the slide by the adjuster crown and see if it will screw right off - this may take several goes.

If the stopper will screw off (it may not), you can then keep screwing the cap and drive the inner tube (it has brass disc screwed into its top end with a threaded hole in it) right off the spindle. You’ll feel when it comes free. Then gently draw the tubes apart (be careful not to twist at all!) and you can use a probe through the thread hole at the top to remove the travelling stopper if you wish. The outer tube will remain fixed within the wooden sleeve, of course. You can then clean the tubes’ contact surfaces and the stopper’s cork lapping, re-grease all and carefully reassemble.

To reassemble, replace the stopper inside the inner tub, then carefully introduce that back into the head, being especially careful when it is most of the way in to line up the locator/guide lug into its slot. Push the tube in until its end-block reaches the spindle, then screw the crown to draw the inner back onto the spindle. Draw it right in until the tuning slide is completely closed, then use your dowel to press and screw the stopper back onto the spindle as far as it will go. Wind the mechanism back to fully open and see if it stops/self-limits or starts to come apart again. It should not come off the spindle at full slide extension unless the stopper has screwed/worked itself outwards along it in the course of use - which is what had happened to mine when it first fell apart! If it does come apart, get it back together as before, then, after screwing the stopper fully home with the slide closed, open the slide a little and screw the stopper a bit more. Now check if the extension is limited, and also that the slide can be fully closed.

This operation lets you get a sealant/lubricant everywhere necessary to restore a good seal between the tubes and between stopper and tube (you can even renew the cork lapping if need be), but it doesn’t let you get at the inner workings of the head screw mechanism, should they need any attention (relatively unlikely).

Beyond all that, I suggest asking Chris Wilkes for his advice, though I know he may not respond if he doesn’t feel like it. He has repaired quite a few PHs (including crack repairs) to my knowledge, and has had mine fully and properly apart.

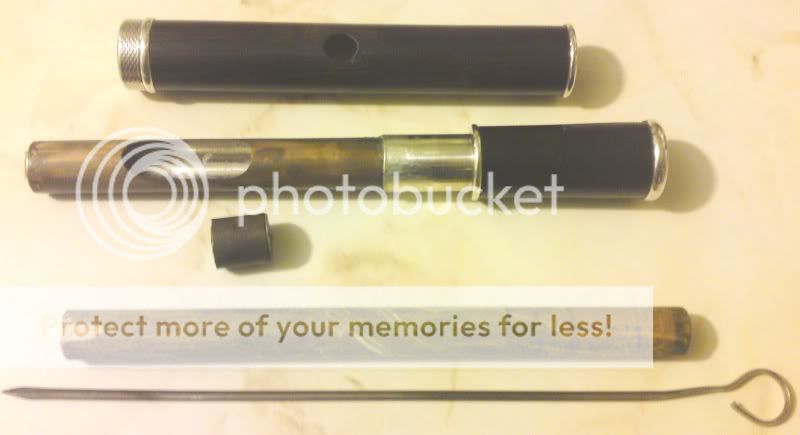
Here are the photos of what I just did to my PH. I’m afraid they had to be done under not very good artificial light, so are not the best! Apologies…

The head disassembed in the manner I described above, with the only tools used - the dowel to “unscrew” the stopper and the skewer to probe through the top thread-hole to push the stopper out.


The stopper/traveller, “short” side (the central bulkhead with the threaded hole through it for the spindle is not placed centrally within the length of the tube, more about a 1/3-2/3 split).


The stopper/traveller, “long” side

Note that the silver faceplate should be soldered to one end, usually the “short” side, I believe. Because mine lost its plate and the replacement is not soldered on, it is easier to do these stages with it removed and to press it back on as the last step of reassembly.

Reinserting the stopper into the inner tube


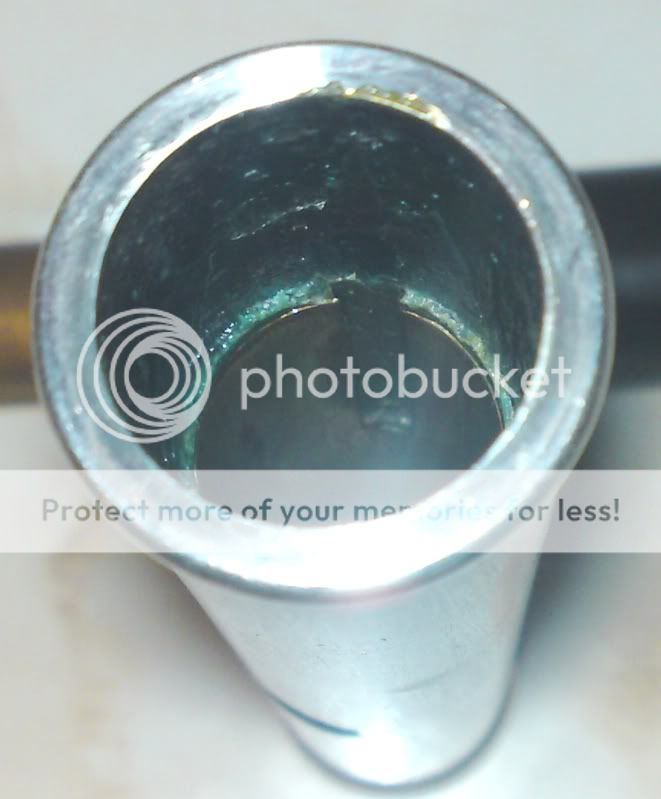
The stopper pushed home to the end of the inner tube (face plate still off)


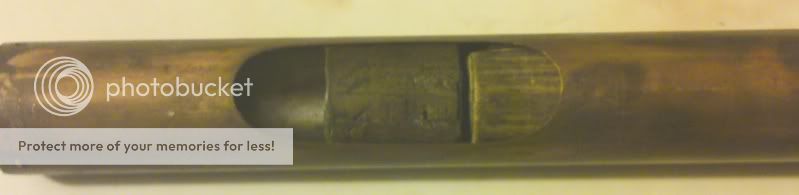
The locator/guide lug on the inner tube. This is what gets damaged/ripped off/mangles the tube if someone tries to twist the head and barrel of a PH like an ordinary head!


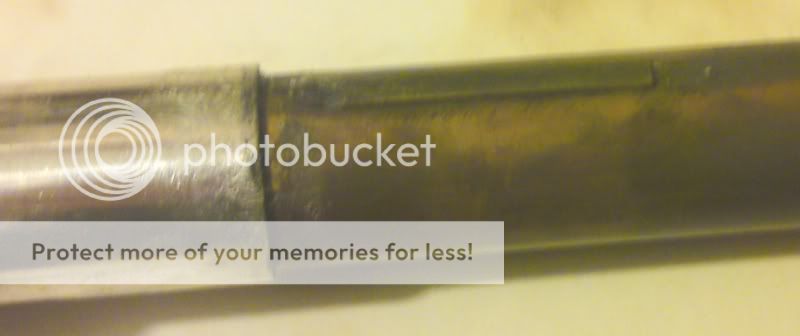
The locator/guide slot in the outer tube, within the head/wooden sleeve

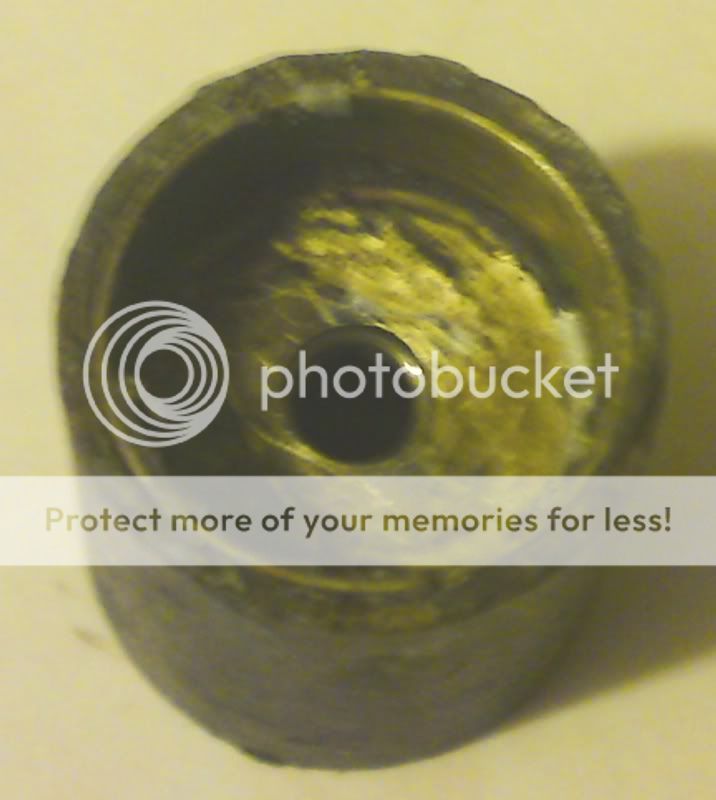
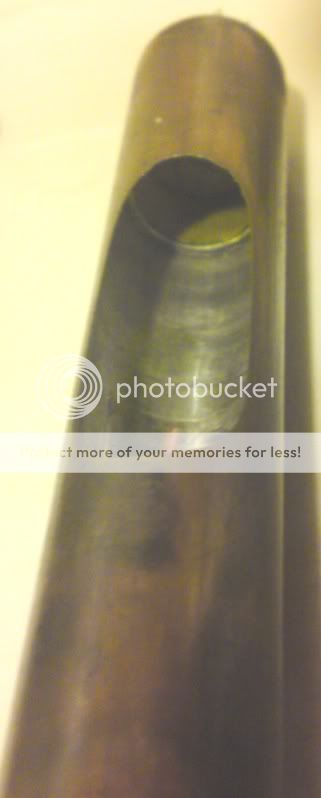
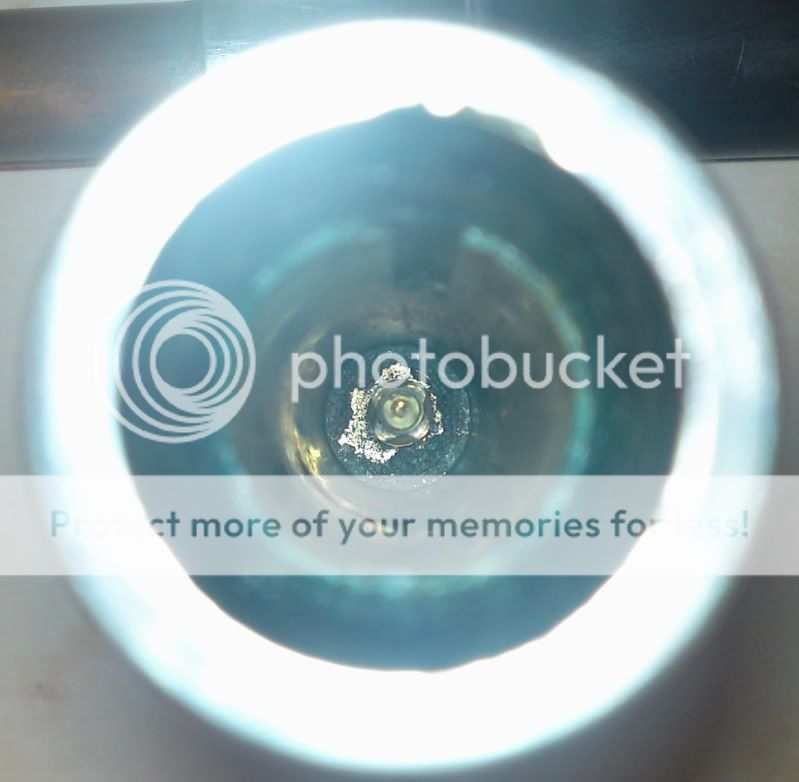
View into the head (outer tube and sleeve before reinserting inner tube) showing the screw spindle at the top


Reinserting the inner tube into the head


The head reassembled, stopper screwed right home, face plate replaced, and then the slide opened to its maximum extension - without falling apart! - the stopper in its correct position on the spindle prevents the tubes being screwed apart.

Holy smokes Jem! That was brilliant. Our headjoint came apart just like flutework.

I wish Jim Howarth were still around. I wonder if the repair community in London knew this trick, or if Rose kept it to himself!

I punched out a piece of closed cell foam and glued it to my flute dowell. The cork unscrewed effortlessly, which leads me to check that for airtightness as well.

The “guide lug” on this R C & Co flute, #6998, appears to be steel, by the way. I’ll post photos later.

I’ll write later after it is all back together again, hopefully.

All the best!

David
www.antiqueflutes.com

Phew! I’m glad it worked so well! I’m sure you can relate to my consternation when it happened to me by accident. I’d already had my flute (#4683) for at least 15 years… (I acquired it from Paul Davies in 1983 or 4). On some occasion I was polishing the silver on it and wound the tuning slide out to full extension to give it a rub with a silver-cloth - and it just wound off! It didn’t fall apart, of course, but I was scared stiff something critical inside had worn out/sheared off etc. Happily I have a practical bent, so I carefully separated the parts and inspected (no computer or Terry McGee website to refer to at the time, Paul D had already died and I wasn’t in communication with Chris W) then tried to reassemble having ascertained nothing seemed broken, and I knew no parts had fallen out and become lost. By application of logic and careful trial and error I managed to get it back together and working properly, and took the opportunity to grease it up.

FWIW, I don’t think Paul Davies knew this was possible - if he had done, I’m sure that when he discovered the missing stopper-face-plate in mine he would have used this method to extract the stopper and fit a new face directly, even if it meant re-corking the traveller, rather than making the wax-fit substitute plate and the dowel applicator for it as he did. As I vaguely recall he may have stated it wasn’t worth the risk and difficulty of attempting a full disassembly from inside the crown.

I am also virtually certain Chris Wilkes didn’t know this could be done either - when I took the head to him a couple of years back and several years after inadvertently discovering this possibility, although I tried to explain to him what had happened, his first reaction was to go for full disassembly, with which he was of course familiar. He had the tools to drive the lynch pin out (which I’d never managed to do when wishing to) and was able to remove the screws (though I don’t think mine had lost too much of their slots) without too much difficulty as they were not badly corroded.

When the boxwood R&R #4764 passed through my agency a while back and Chris restored it for its new owner, he had to make multiple crack repairs to the head (none through the embouchure) and also restore the PH mechanism, which had been damaged and the workings of which had become corroded and gummed up. He had to do a full strip of the head to separate and clean components, and I believe he had to drill out the badly corroded mounting screws, to effect which he had to construct special jigs… I think I recall that the guide lug was torn off and had gone AWOL, probably having fallen out through the worst of the cracks, so he had to make and attach a new one, but fortunately the inner tube was not too badly damaged by the lug tearing off. Anyway, it’s good as new now, save that crack repairs in boxwood are never going to be close to invisible.

So, whether the 1st 1/2 C20th or later C19th craftsmen at RC&Co knew this could be done and did it if called upon, who can say? I think it is possible they did not. I also rather suspect that they were virtually never asked to look at PH flutes after c 1870. Although this possibility is inherent in the design, I wonder if even Rose himself (or whoever designed the mechanism for him at his behest) either intended it as a maintenance feature (since re-greasing periodically is certainly beneficial, even necessary to optimum performance) or even realised it was possible.

Let us know how the reassembly works out and whether the seal and performance is improved, as it should be. BTW, I assume your stopper has the face-plate in situ? Which end is it attached to, and can you please photograph it while you have it out and post the pics?

A further thought on the PH mechanics: if the lapping on the stopper-traveller is a good, tight fit in the inner tube, the stopper will not be (so) liable to rotate within the tube as it is screwed to and fro by the tuning mechanism. The tubes, of course, cannot rotate. However, if the stopper becomes a somewhat looser fit, and especially if the brass adjuster mechanism stiffens up with corrosion, lack of lubrication etc., then there may be some tendency for the spindle to impart some of its rotation to the stopper and move it gradually from its correct calibration until it falls off the spindle’s end - which presumably is what happened to me/mine. Application of a good, thick, gloopy grease to the lapping and lubrication of the spindle and drive discs should help prevent this happening, but if the stopper is too easily rotated within the head tube that may be an indication that renewal of the cork lapping is advisable.

Oh, and with the boxwood PH, having drilled those dead screws out, AIR Chris made the replacements from scratch. That’s Chris for you.

[quote=“shoreyflutes”]

Several technicians, especially Jon and Patrick, speak of sanding down the bore away from the embouchure area. This sounds good, but must leave the bore with an asymmetrical hole, exacerbating any ovulation (thanks for this new addition to flute lexicography, Jon!). I am curious to hear how successful this has been.[quote]
It has been successful, the trick is to take enough off so when the wood moves it doesn’t open the crack again. I have not been able to hatch any new PH chicks yet…

Jon mentions the possibility of closing an embouchure crack and then cutting the head joint on the far side, creating an easily filled gap. This also has appeal, but we have never had the balls to try it out.

I have used this technique to repair head that are unlined, so it should work with a lined flute. Just mill a slot and graft new cocus in the slot. It also reverses the pressure on the crack, by expanding the bore slightly.

Methods of re-hydrating the wood, such as steaming, soaking in water or linseed oil, etc. seem never to work. I have seen flutes soaked overnight in linseed oil only to have freaked out by morning, expanding hugely in all the wrong directions. Hence our attempts to control the expansion. We use hose clamps with cork linings gapped to miss the crack areas when glueing, and tried these on a head soaking in linseed oil. As I mentioned earlier, so far six months of soaking has not done what we had hoped.
As Terry mentioned once, when the cellular structure of the wood shrinks, it collapses, and never goes back to it’s original shape.

I agree with Jon that our headjoint with the embouchure crack needs to be dismantled for any crack repair, especially with the patent mechanism.

It is the headjoint without the crack that I hope not to have to dismantle. There are three screws holding the patent head together under the crown which are generally ground down by the maker so the crown can turn. These need to have new slots cut into them for removal. I hate to take cutting tools to such a magnificent piece of history, unless absolutely necessary. On this flute the air leaks out between the sliding tubes I believe, so I am seeking a liquid lubricant that will leave lubricant where we want it, namely between the tubes, without harming anything else. Any ideas?

The last PH I did, every screw had to be drilled, due to rust. I re-tap the hole and use stainless screws. The screws that secures to the inner liner, has to have the screw heads filed quite a bit.

Successful and long lasting embouchure crack repairs are the holy grail of restorationists; long sought and rarely found. I am curious about the forced ovulation technique. Do you glue the tube back in with epoxy, so that there is a constant connection twixt wood and metal? Absent a round bore, is the flute’s playability and resonance affected by gaps, thus hindering the full vibration of the flute tube?

Epoxy is best, but you can go traditional with shellac if you like. the liner usually fits, so you don’t have much of a gap. It is important not to make the bore to tight and distort the outer sleeve, as the inner sleeve has to turn freely

I am also curious about technique. Do you hand-sand with a papered dowell, or use a lathe? How do you control symmetry as much as possible? Thank you very much for sharing your findings!
I use a metal rod with sand paper on the lathe. the trick is to be careful! :smiley:

Another point, the cork has to be fairly tight in the inner sleeve, or it will unscrew itself, and replicate Jems trick and come apart!

All the very best,

David

While we wait for David to respond, I think we can answer your question:

More, including Rudall & Rose’s full specification, at http://www.mcgee-flutes.com/RR_Patent_Head.htm.

I’ve been intending for years to get this up - the recent flurry of interest has provided the impetus. Sorry it has taken so long!

Terry

Thanks, Terry. That’s a great addition. Can I suggest you append “my” partial disassembly technique to your original PH page (since it is the main current internet resource on the topic) as a maintenance tip?

:smiley: that takes a bit of the mystery out of it!

Thanks, Terry!

This patent specification brings up another question, very relevant to me regarding the 1847 patent of Rose’s based on Boehm’s cylindrical tube:

Was there any protection starting from the initial filing date, or was it necessary to have the specifications and drawings submitted in order to make protected use of the patent idea?

I realize that this diverges from our original topic, but perhaps there are some patent attorneys lurking?

All the very best,

David
www.antiqueflutes.com

Ha ha, David, great minds, etc. (OK, OK, “Fools Never Differ”!) I’ve been musing on a similar question overnight. I wondered if the initial period was to permit public notice, with possibly the right to appeal, before the Patent was granted. If that were the case, it would be great to know if any appeals were submitted on the various patents over the period.

It would be good to have answers to these questions. Modern practice may vary. Does anyone have a copy of “Patents for Inventions: Abridgements of Specifications relating to Music & Musical Instruments, A.D. 1694-1866 1984 Facsimile of 1871 Edition. 520pp. with abridgements of all 740 English patents issued before 1867”? Does it reveal the details of how the patent system worked at that time?

Alternatively, I’ll send an owl to the Circumlocution Office. I’ve found them helpful in the past.

Terry

So what was the upshot, David? A happy, airtight conclusion, I hope!