What gives flutes/whistles/recorders their distinctive signature sound?

Is the signature sound of each type of instrument primarily generated by the wedge?

I ask this because I’ve been doing a few experiments with a quena where I’ve added parts made out of compressed tinfoil to create a mouthpiece for it to find out what difference that makes to the sound, but it still sounds distinctively like a quena regardless. I obviously don’t want to cut up an instrument to experiment with the wedges in a recorder or tin whistle, but I was wondering if making wedges the same shapes as are used in those instruments and playing them in the manner of a quena would produce the characteristic signatures of those other instruments instead.

I’m exploring this because I want to have a go at making my own instruments, primarily to try out different hole placements and sizes in order to make the larger instruments more comfortable to play by reducing the stretching, and by moving some of holes a short way round the side to better suit the lengths of my fingers. I’m also thinking about trying varying the size of the bore in steps to help reduce or increase the distance between some pairs of holes, but perhaps such changes in the bore need to be gradual rather than abrupt, and it may also be misguided if it makes higher octaves out of tune. Is there a set of general rules or principles for this which all would-be wind-instrument makers can be pointed to?

Some interesting thoughts there…

I believe the distinctive sound comes from the air column being split, reed instruments & brass use all the air we blow.

Hole placement appears to be very limited in positioning possibilities, we have some with offset holes, (what you are thinking), but the spacing is quite similar to those of inline, (I have both variants), also tapered bore against straight doesn’t allow for much difference in hole placement either.

Personal opinion, I would expect the sound to be about the same if you cut off the top part of a whistle head & blew over the blade, with a very narrow focused air stream, like with flute playing.

Is there a set of general rules or principles for this which all would-be wind-instrument makers can be pointed to?

You can have a look in Arthur H. Benade’s various works, if you are serious about this. Other, simpler stuff available too. It helps if you have some basic understanding of the underlying principles if you want to have a go at it.

Making flutes and whistles is a lot of fun, but patience is needed, and a fair amount of contemplation as you go along. As Mr. Gumby suggests, and there are also whistle building sites mentioned elsewhere here that have ideas, and odds and ends of information found in various places or discussions here and elsewhere. If you look through my thread on making flutes there are various links, the one I had in mind was a pdf towards the end on tuning recorders which has some detail.

I don’t think there is a set answer to what is possible, but it is sensible to take into account the large amount of learning already achieved.

For bore shape there are some principles, but trial and error reveals facets that you won’t find mentioned anywhere…which are then for the maker to try to figure out. A hard stepped bore will introduce some quite distinct features I should think, normally the bore is smoothed (even if stepped or chambeted) to avoid those, but it is not possible to say if hard stepped might produce a playable flute. Certainly there are flutes where the bore changes at angles, then straight in between, along their length (am thinking glass flutes I have seen, also the head join of conical flutes ).

For the lip of the quena, same applies. There the “window” is pretty much set by embouchure, so that will probably have more effect than the lip shape, or to say if you redesign the “window” into account then the effect of changing the lip will also be more noticeable. There is no set answer, but either way any changes to design will be noticeable to one degree or another, often player variables are so large between testing the sound that differences can be difficult to be sure of. Fitting the removable head of a cheap recorder to similar sized quena bore, and making a “quena head” to fit over a recorder bore might give some answers as to sound ?

Thanks for the replies.

Well, this is the main thing I want to fix because my hands are so damaged by RSI from typing. I need to maximise playing comfort and minimise unnecessary sideways (to fingers) forces. When you look at the holes on a whistle going from the top down, it’s small-big-big small-big-big. If the top three were big-big-small instead, they could be brought closer together, and the same can be done with the low three holes. I’ve watched people making quenas and seen one manufacturer (and very good player) put the hole underneath further down the tube while making it larger, which puts it in a more comfortable position, so this principle clearly works. He also placed the lowest hole a long way to one side to make that more comfortable. Most instruments are made to be playable left or right handed, and that makes them a compromise with them not being maximally comfortable for any player. To achieve maximum comfort, you likely need to make your own instruments, or at least make the holes yourself. I want to chamfer the holes too, which can’t be done retrospectively to a bought instrument as it will affect the pitch of the notes, but I know how much that improves the comfort of playing after having a go on a quena belonging to a member of the group Yuraj Marka (long ago when they played in Edinburgh). There’s no simple tool to do that quickly to a hole in a curved surface in a consistent way (unless the tube is made in a mould), so it would add a lot to the cost of any bought instrument.

A tapered bore appears to allow the holes be closer together, and likely makes it possible to move them further apart too if you have it widen instead as it goes down, which could be useful on the smallest instruments. When you compare a recorder with a whistle, it’s the E flat whistle that matches the hole separation distances of the C recorder, making the C whistle less comfortable for me due to the extra stretching, hindering fast playing.


Thanks for that lead: I’ve found “fundamentals of musical acoustics” and put it on my Amazon wishlist, but I’ll get it from the library first to decide whether to buy a copy or not.


I’ll hunt for that thread.

Edit: I assume it’s “Basic wooden flutemaking method, and resources”.

A hard stepped bore will introduce some quite distinct features I should think, normally the bore is smoothed (even if stepped or chambeted) to avoid those, but it is not possible to say if hard stepped might produce a playable flute.

Quenas have a sudden bore change right at the bottom without any obvious ill effects, and it looks as if they do that to add strength to the tube more than anything else (though it also shortens it a little) - this would have been more important with the original materials used. One of my cane quenas split from the top end down, so having that flange at the base halves the risk of that happening. I’m not set on varying the bore, but want to experiment with it to see if any advantage can be gained from it. It may lead to an instrument that’s either too heavy or has an ugly shape.

Fitting the removable head of a cheap recorder to similar sized quena bore, and making a “quena head” to fit over a recorder bore might give some answers as to sound ?

I don’t have a cheap one to take apart, and I wouldn’t want to do it even to a cheap one if the experiment’s already been done, but I’ll have a go at copying the shape of the recorder wedge and window: I’m going to start with softwood prototypes where I can just keep cutting the top off and have another go.

Short answer: no, not just the wedge. Timbre is also affected by the dimensions of the window (h/w/d), the dimensions of the opening of the windway, the position of the splitting edge relative to the windway, the bore relative to the pitch, maybe the depth of the toneholes, and a dozen other considerations that I don’t know about.

Yes, you can make a hole larger and further down the tube, or smaller and farther up the tube, and keep the pitch the same in the first octave, but it is likely to shift the pitch in the second octave.

There are a number of calculators to help you with calculating the position of toneholes, noted in various posts here. They include adaptations of Flutomat, on http://twjcalc.sourceforge.net, NAFlutomat - Native American Flute Design Tool, https://www.music.bracker.uk/Music/Whistle-Calculator.html, Calculator – Whistlemaker; and WIDesigner at Using WIDesigner · edwardkort/WWIDesigner Wiki · GitHub.

The thread at Hobbyist whistle maker - Tech - Chiff & Fipple is worth a read.

Yes, the pdf I had in mind was this

The recorder: A basic workshop manual
Adrian Brown

https://3lib.net/book/18064289/df0578

It should download ok, it covers quite a lot of theory.

[Also https://www.flute-a-bec.com/documentsgb.html has some theory in first two links ]

Well, I experimented with quite a few of those things and and it consistently sounded like a quena, so I’ll have to try making my own recorder and whistle style wedges to see what that does. I’m expect I’ll soon have some failed tubes which will never become complete instruments to test that on, so I’ll be able to cut the end off repeatedly to try another shape.

Yes, you can make a hole larger and further down the tube, or smaller and farther up the tube, and keep the pitch the same in the first octave, but it is likely to shift the pitch in the second octave.

That’s likely the reason for standard hole patterns being used, and yet I’ve seen enough variety in viable hole positions and sizes to wonder if there’s some pattern that can predict all the viable ones.

There are a number of calculators to help you with calculating the position of toneholes, noted in various posts here. They include adaptations of Flutomat, on > http://twjcalc.sourceforge.net> , > NAFlutomat - Native American Flute Design Tool> , > https://www.music.bracker.uk/Music/Whistle-Calculator.html> , > Calculator – Whistlemaker> ; and WIDesigner at > Using WIDesigner · edwardkort/WWIDesigner Wiki · GitHub> .

I’ll look through all of those, and the many other links on the thread you linked to. Thanks - lots of reading there for me to do!

I’ve had trouble with viruses on that site before, so I’ll try to get it via a library machine.

[Also > https://www.flute-a-bec.com/documentsgb.html > has some theory in first two links ]

Interesting stuff there, but there was a particularly interesting thing linked to from your Basic wooden flutemaking method, and resources thread which describes how to modify holes by undercutting and waxing in such a way as to change a note in the first or second octave without altering it so much in the other, enabling you to tune them in both octaves, so that was a particularly useful find which I’ll try to apply. https://woodenflute.com/building - I’ll try to apply the rules from that to tune each hole to both octaves as I make them, hopefully without needing the waxing part of it. This could be the key to making my project work.

I was very impressed with all your drill bit making and home-made set up - I’d never have thought of doing it that way. I’m currently trying to make flutes that are under 40cm long, so I’ve bought an auger and a speedbor of that length to see if I can steer them through fat sticks accurately enough (it won’t matter if they wander a little), and then I’ll whittle them down (with hatchet and knife) and experiment with holes. I have four straight sticks ready for drilling. The wood’s discoloured part of the way through, so it’s no loss if they all go wrong - I’m saving the better wood for later.

Thanks :slight_smile: , that thread is a mixture of ideas and what I’m up to etc. , but it’s not very organised and I just use the page to note down anything new along those lines. There is quite a lot that can be done for the spacing of toneholes, every bit counts (bore shape, tonehole size etc.). With undercutting in one direction / waxing, the tonehole can be moved without much changing its character. I.e. if the hole is slanted so that the surface moves closer to another tonehole (easier on thicker walled instrument) it should still play close to original placement. Changing tonehole size changes tone and also affects position of neighbouring holes to varying degrees, but I don’t think there is a set formula to figure out exactly how, just the kind of effect is known.

An auger should drill quite fast at least, and if the wood is spare then at most it is trial and error until you get a well enough centered bore. It depends a lot on the width of the wood also and how good at estimating direction anyone is… I just say it is maybe more difficult than it seems… or maybe I’m not a very good at aiming :slight_smile: . I suppose for an auger bit a short tube could be set at start as guide, in a sort of jig, if you find it difficult . Half bored pieces can be used to make sections etc. also.

I hope you have fun with it all.

I ran into an unexpected problem. Once I’d whittled my first piece of manky wood down enough to identify the best path to bore through it, I ended up with wood of high quality which had been hidden inside, so that put the pressure on not to mess it up. I bored the hole through it today using a 16mm speedbor rather than the auger as I thought it might be easier to steer because the shaft is a good bit narrower than the tip, and it was indeed easy to steer: it bored a straight path in exactly the direction I wanted it to go in, after making a few little corrections near the start which don’t show up to the eye when you look down it. An auger would have kept going in the original direction with no way to correct it, so the speedbor is the better tool for the job. I held the drill in one hand, the end of the stick/rod to be drilled in the other, and jammed the other end of the stick into a corner to keep it still, then just kept looking down the shaft of the 400mm bit alternately over the top and down the side to make sure it was pointing straight through the stick, running the drill at the slowest speed that could turn it. It wasn’t a quick task as it was difficult to extract it to clear out the dust it generates (which was partly turned to paste as I had to add a few drops of water after each go to stop it squealing), and the friction’s sufficiently high that it has to be rotating fast to get it out. I had to use a narrower bore auger to clear out the dust and paste where it jammed up as the speedbor often failed to pull it out when extracted. I made sure I was never holding the stick where the tip of the drill was working, just in case it burst through, though there was no real danger that as the stick was over 40mm thick. Having seen how well it worked though, I think it might be possible to do this with bought 25mm wide hardwood rods and save a lot of time. I’ve now drilled a narrower hole in from the other end, so the next task’s to cut a wedge into the opening at the top, and I don’t know what the best shape for that is as my four bought quenas don’t have the best sound quality (nowhere close to the quality of sound from the one a professional player let me have a go on), so I don’t want to copy them. I’ve seen videos of experts making them, but they don’t show the end result close up.

I hope you have fun with it all.

It’s good to have a break from thinking about the war in Ukraine.

Not such a problem if you managed to drill it ok :slight_smile: . I have heard that of augers, that they get very set in their direction. One thing I noticed is that if the bit gets close to the outside, it has a tendency to walk towards it. Maybe softer wood on outside does this, or the wood flexes out allowing that to happen. Usually you can tell if you are close to outside because the wood will feel much hotter in a particular place. I don’t like it when it squeals while drilling, it can be very loud. Normally it shouldn’t though, because squealing is from sides rubbing, not cutting…I guess if you are changing direction or from build up of swarf ? Personally I never add water, and am not sure if that is what is done or not.

I don’t know anything about quena embouchure cuts at all. Maybe someone else will link a detail, all I found was this

https://m.youtube.com/watch?v=jG8-ZI3ZNsQ

which I expect you have watched. Usually for embouchure work, beyond basic design detail, many makers seem to think that practice and trial and error are what teach the most…either that or very precise copy.

There is only so far thinking about anything goes, applying attention and effort to something sort of grounds us to a closer reality.

If you don’t speak Spanish…

“como fabricar la boca hacer el bisel de una quena”

in search brings up a lot of videos, pdfs etc. … there should be some good information amongst it all :slight_smile:

The above search is without quotes “”

This morning I had a short look through what is offered

https://m.youtube.com/watch?v=AQPQpC4kKC0

has shaping the bisel for example, says keep the lip centered through thickness of the cane ( i.e. forward edge looks like < ) , as well as along axis ( ]----- ).

Thanks - I can read Spanish, but didn’t know the word bisel, so I wasn’t sure what to call it in Spanish for searching.

I’ve had lots of goes at it and have now shortened my quena to the point that it’ll play sharp if I keep going, so I’ll have to put it aside and make another one to continue with. I got a decent note out of it a few times, but an octave up from the one I wanted, and tiny adjustments led to that being lost every time rather than improving on it. This may take a long time…

…it takes time, but is only as demanding as anyone is towards it all. I think there is a bit of zen to it, because when approached in the right way everything seems to make sense, but to try to oblige an instrument to be a certain way and soon frustration will set in. So it is more an “enjoy the journey” sort of activity, and if the destination ends up good, so much the better. :thumbsup:

It’s the inner bisel that’s the problem - I found a video with someone drawing a diagrams of how to shape that, and I’m now getting the lower note, but need to work on improving the quality. I’ve drilled the lowest three finger holes and got them as close together as the ones on my D tin whistle (which is a fifth higher in pitch), so it’s really comfortable. The middle hole is bigger than on a normal quena, and the lowest one is smaller than normal (still a bit flat as I haven’t tuned them carefully yet), but the volumes don’t seem to be greatly different, so they’re fine, and that means my main objective should be achievable, provided that I can get the sound quality I’m after as well. I need to buy a round file - using sandpaper round a pen is a poor substitute.

That’s great. Personally I don’t get too caught up on tonehole size…it makes a difference (response for small vs flexibility like slides for large, very small and you lose some tone and loudness) but not too much difference in my opinion. Still, some tend to focus on toneholes as an answer to how a flute plays, but I find the underlying sound is there whatever adjustment (within reason) is made to them, and that the sound is based more on bore, flute embouchure and player’s choice of technique. So if you have found an arrangement that works for tuning and spacing, finding how to get a good sound from the flute itself is a supplement to that and should not need change in layout. Once a design is found that is good, then tweaking on subsequent ones of that if built, and learning about related small detail is possible, which can also be fun :slight_smile:

I put the upper three holes too far up, so they aren’t as big as I’d planned, but it doesn’t matter on this experimental instrument anyway as it’s now set a tone too high due to all the repeated attempts to get the notch right, and it still isn’t sounding the notes well enough: I can’t get it to play the highest two notes of the second octave at all. That’s what I need to fix most.

By the way, I’ve found a way of measuring where the drill tip is within the wood to within perhaps a fifth of a millimetre while boring it. The key to this is to use a magnet. By luck, the speedbor has three cutting edges, and that allows you to measure the distance from each of them to the magnet by having the magnet lift towards them when they get close enough to it. If the magnet can’t get close enough to lift itself straight up, that’s no problem as it can be set to move sideways instead so that it moves more easily - I’ve tested this with a weak fridge magnet which can be set up at an angle such that it just swings over when the drill bit tip gets to a very specific distance from it, while wood is of course completely transparent to the magnet. This means I should be able to buy 600x25mm birch rods (the most suitable ones that I can get from Amazon) and drill them right down the middle with an 18mmm speedbor with the side walls averaging 3.5mm wide and only varying by perhaps 0.5mm. It might even be possible to do it with a 20mm bit with the sidewalls averaging 2.5mm and going down to 2mm in places, though I don’t know if that’s considered thick enough for a flute when it comes to sound quality, and it could limit the options too much when shaping the holes. The 18mm bit may be easier to steer than the 16mm one as the shaft looks as if it may be narrower relative to the cutting part, so it’s likely the best one to use for making quenas from the readily available 25mm diameter rods. I doubt they knew it when they designed these bits, but I think they’ve made the perfect tool for boring out a rod with high precision while using a hand-held drill, and that makes this process very inexpensive. That said, I haven’t actually done it yet for real, but the physics of it can’t be wrong so I’m now going to risk it and buy some of those rods to try it. If it goes way off course within the first 20cm, I can abandon that attempt and try from the other end, so I’ll get two goes at it for each rod.

That is a good idea

At 50cm,
Rod thickness 1cm
Bore 2cm
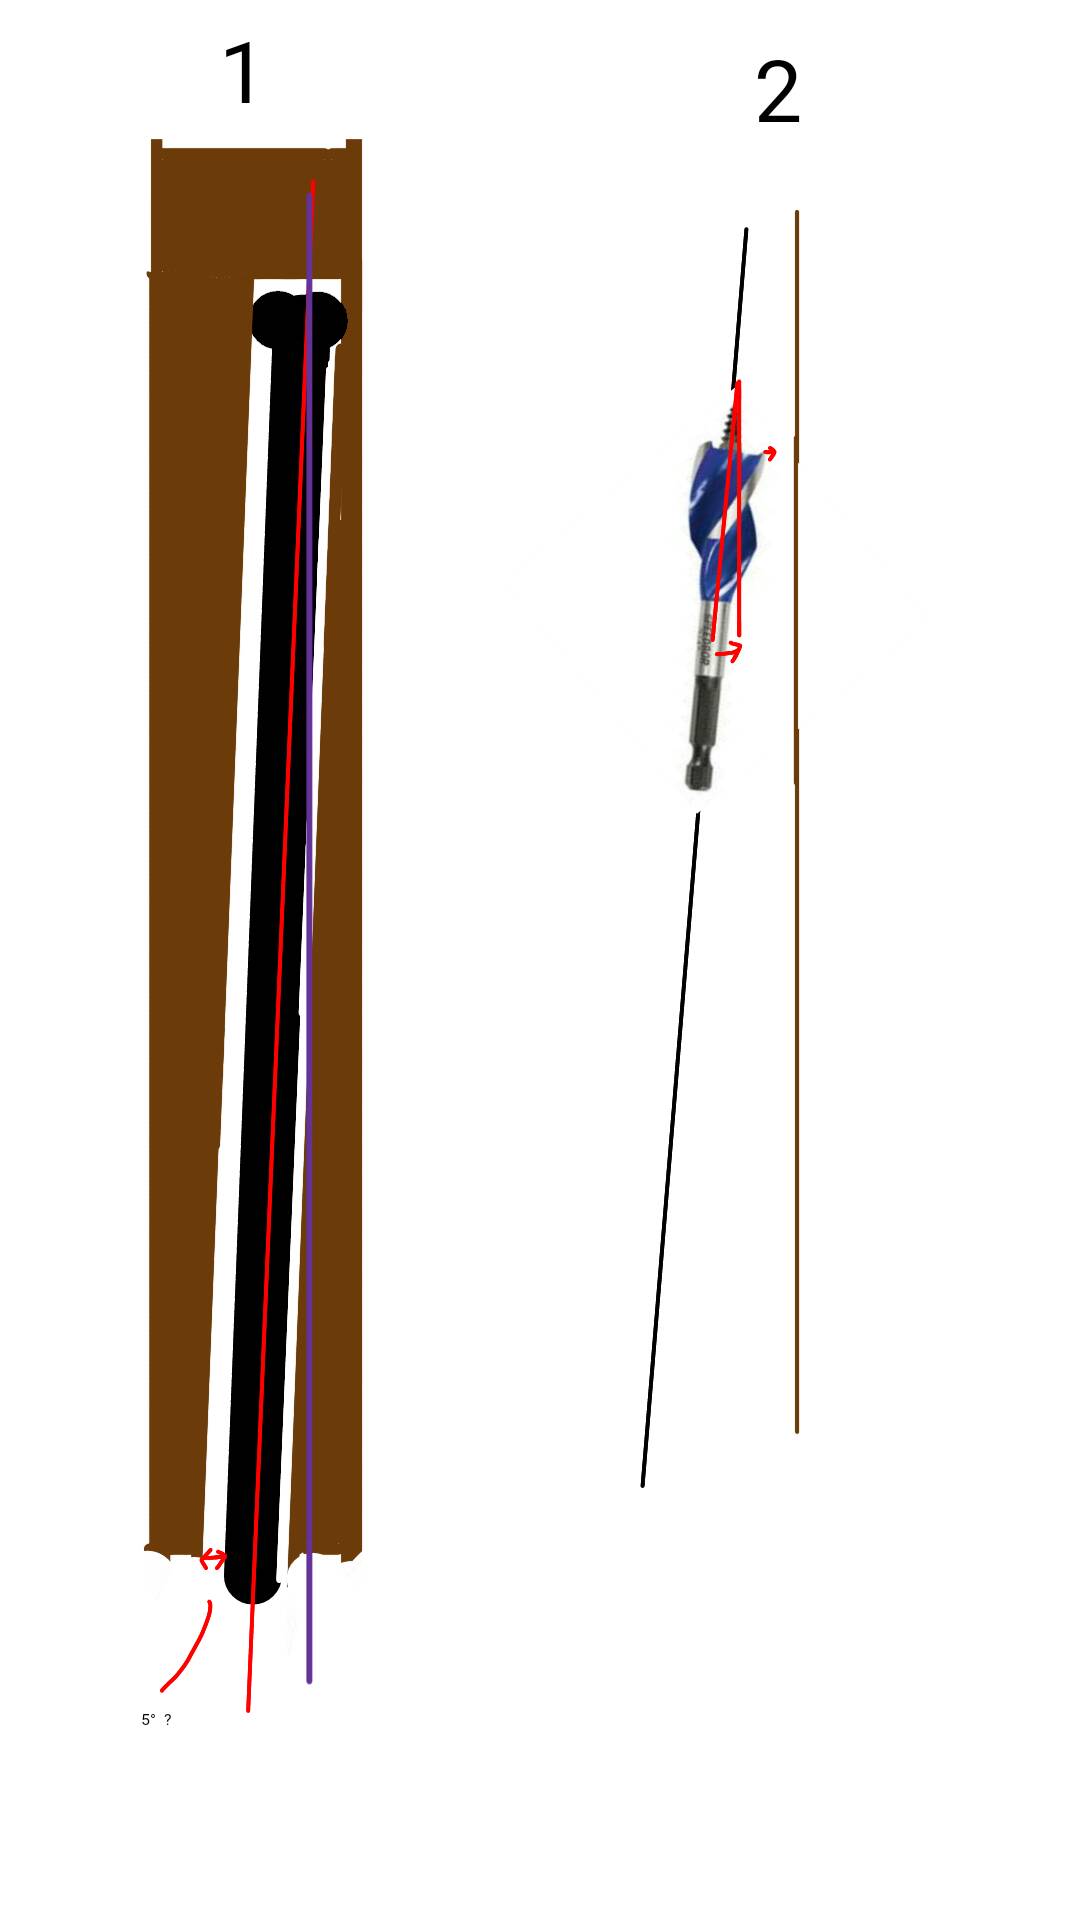
Steering room of rod at start is 2cm - 1cm / 2 = 0.5cm = roughly 5° change in direction.

In fig 1 below I try to draw the limit to this, that is to say to just set the bore parallel lengthwise (but still off center) in that example, the rod might need to be outside the bore (purple line) and in that circumstance you would end up with a bore that curves away from the edge but still moving towards the outside, but at a lesser angle (i.e. further down the flute, hopefully after the end of it).

However I haven’t done a full calculation, and in theory, with rod 1cm diameter and bore 2cm, the leeway is therefore 0.5cm for the tip of the powerbore where you can still set it straight. At 0.5cm it would then continue parallel but the bore remain off center.

Remembering that the point will act like pivot and the blades will lift a tad towards edge at first when steered (fig 2)


So these are quite small tolerances to measure down the bore, and not forgetting that sometimes the bit will walk slightly by itself, and also there will be some mm of flex in the rod as it gets longer, something drillbits like to take advantage of.


So, at my guess you will have to keep the bit near center the whole time (or use a thickness of wood that allows for whatever error appears) for this to work, and I hope it does work.

The only idea I had with regard, is that if tilting the rod to steer the bit is not enough, then a half pipe of say plastic (e.g. 0.7 cm thick plastic if the gap between rod and wood is 0.5cm when centered) could be pushed down the side where the drillbit is too close to edge, so making the drillbit move back towards center by leverage. Powerbore have lead screws I think, which might not allow this to occur, but you could always load a simple spade bit for the maneuver ?

If you are not short of blanks of wood and drilling is fast, then even only getting one in every few right might be acceptable, but I hope you manage to consistently drill them as wanted.

2mm is maybe thick enough if the wood is good etc. , but in my opinion it is about at limit even then. I have made “bores” for lining bores about 1mm thick, and they were solid enough to handle normally (but not to apply great pressure to), but the problem is that if they were the actual bore, moisture changes etc. would probably weaken, warp and split them eventually. One flute ended up with a paper thin (literally) area (about 1cm wide by 3cm long) that I could flex by finger pressure… it lasted for a few months before a very fine split appeared, unnoticeable by eye but enough to make the flute jump octaves randomly…patched it and all good again. For tuning I think there are both advantages and disadvantages to a thin walled bore, but I leave that there.

Top notes tend to be the more difficult of them to tune the flute to play, plus the player has to have confidence that he or she is well able to play those normally.

:thumbsup: