Metzler Flute Short foot

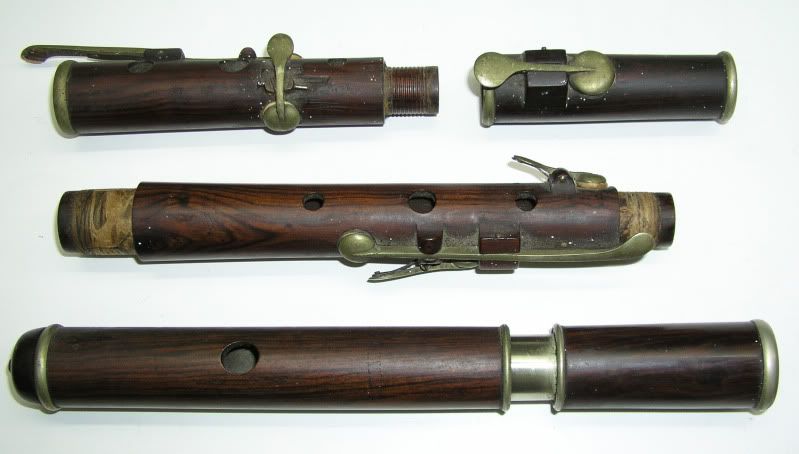
Well I’ve finally taken the plunge and, after many heated battles, been successful in an e-bay purchase of a “fixer-upper” flute. It has just arrived in my hot little hands, thank you UK postal strike, and I’m very excited to get my hands dirty working on it. This one appears to be a mid 19th century, block mounted, 6-key, Metzler with a short foot (visually looking a lot like a McGee GLP). I hope it plays in A440, but will not be able to tell until some repairs are made. When I get a chance I’ll measure the hole separation and compare it to those listed on Terry’s site and with my blackwood Ward and delrin Seery unkeyed flutes.

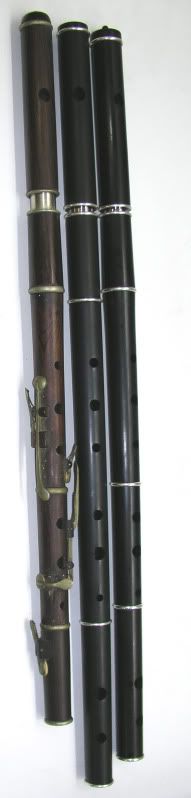
On the positive side the partially lined head joint is intact, with a nice clean oval embouchure hole and threaded wooden crown stopper assemblage. All keys are also intact, the slide functions nicely, and the wood is a nicely figured cocus (I think). On the other hand there is the typical, thru and thru barrel crack, two posts that need replacement, sticky springs, a foot joint that rotates, but will not separate, a frozen cork, and a complete repadding and tenon threading in my future.

I’m pretty handy, so none of this scares me, but I’d love to get some feedback from the experts here on my planned strategy. I first plan to remove all the keys, clean them up and replace the pads with clarinet, oboe or bassoon pads as described elsewhere in this forum. Then I’ll press out the cork and either modify or replace it with a new one that seals, but moves more freely. If possible I’ll just clean off the brass leaf springs and bend them to increase the pressure on the pad face. I may insert small sections of thin sheet stainless on the spring strike location as well to reduce friction at those locations.

Then the more challenging repairs are left: crack repair, stuck foot and the posts. The barrel joint crack is clearly thru the body of the partially lined barrel, right in line with the grain in the section where it is not lined, all the way to the socket. It looks like it may be able to be squeezed back together with hose clamps, and glued with thin cyanoacrylate, but I am concerned about later stress cracks popping it back open. I know that Terry advises total removal of the slide, gluing and reboring the barrel, and restoration of the assemblage. While I’m sure this is the optimal method, I don’t have an arbor press and would be very concerned about removal without further damaging the wood or slide. I may go for an internal milling and repair, again per Terry’s recommendations, but am not sure my vintage Unimat is up to the task.

Right now I’m slowly humidifying the flute and hoping that the consequent expansion will help close up the crack and, possibly, free up the foot joint. If I get lucky I’ll just glue it up and hope for the best. That socket is a major stress location due to the three point “Rockstro” grip I use, so the milling and turning option would probably be the best. At least it has the typical simple silver rings to reinforce.

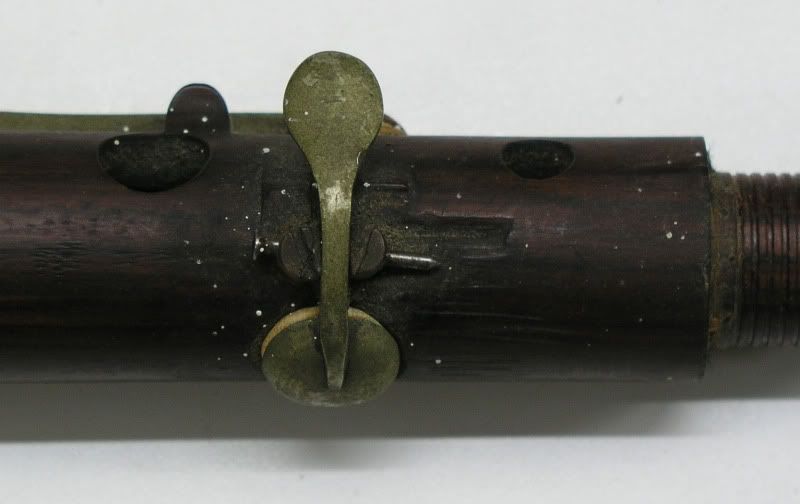
As far as the two posts that need repair, I’m kind of on the fence there. Once I get a chance to post photos (not sure how to do that), it should be more clear what I’m dealing with. At one location, half of the post had split and been replaced with a bent steel wire pressed into what was left of the post. This actually seems to work pretty well for holding the key in place, but until I replace the pads and fix the springs it is not possible to tell whether it functions properly. Of course I’d like to restore the flute to its previous glory, so I may just yank out the wire, file the section flat, and glue on a replacement post. With the other half of the post still intact to use as a guide, it shouldn’t be that hard to drill out the hinge pin hole in the new section. I was thinking of using “Gorilla Glue” for this portion of the repair and wondered if anyone has used it on posts. I will probably pre-shape the post to match the existing half before gluing on to the body to avoid slipups.

The other problem post looks as though it had been broken in half and redrilled at some time in the past with a brad used in place of the old hinge pin. Here a picture would really help as it is a bit tough to describe. I think this will be a candidate for full replacement, but am worried as I have no original pattern to work from. I guess if it works I could just replace the hinge pin and leave well enough alone.

As mentioned above I’d love to hear back from any of you experienced repairers with suggestions, including anything on lubrication or bushings/washers for the key hinges. Sorry about the long post, but I guess I’m pretty excited with this new project.

Thanks

bump for added photos

Hi,
Yes you have a project there!
Be careful when bending the brass springs, as they become quite brittle. You will know when they are cracked, they will not retain their spring. The barrel crack needs the sleeve to be removed, then close and glue the crack, you can fill with blackwood dust and CA glue. The crack will not close without the sleeve removed, as the wood has shrunk around the metal. You then have to bore or sand the inside of the bore to refit the sleeve.
That was quite a creative repair they did on the broken blocks! I have seen some interesting variations. I usually mill the block down past the pivot pin, and glue a new block on with good quality epoxy. Gorilla glue will work, but can be messy, if it foams up. I used to pre-shape the block, before I got my micro mill, it is kind of like a dentist fitting a crown! It is important to get it below the pivot pin, or it will pop off, with the stress. go to the Dayton Miller Collection for detailed photos of the block design.
http://memory.loc.gov/cgi-bin/map_item.pl?data=/home/www/data/service/music/dcmflute/1400/1405f1.jp2&title=DCM+1405:+++Metzler+%26+Co.+/+Flute+in+C&style=dcmflute&itemLink=r?ammem/dcm:@field(NUMBER+@band(1405%20dcmflute))
Good luck!
Jon

I’m with Jon - you must remove the liner to fix the barrel crack. You don’t need any fancy tools to do that - usually, anyway. Just something to heat it to melt the shellac holding it in. Chris Wilkes reckons most of them can be freed by holding them in kettle steam, but if not, a hot-air gun will normally suffice - we’ve written all this up here before…somewhere. Or see my and Jon’s Facebook stuff on repairs. Then you need a means of getting a firm grip on the protruding part of the metal liner to pull/twist it out. Don’t worry about damage to either liner or wood - unlikely, and if any it won’t be serious or beyond fixing. Worst case scenario is cracking the wood in a second place - which solves the removal problem and merely doubles the crack repair work without making it any more difficult.

You don’t necessarily need to do any fancy milling inside the socket either. Once the crack is glued shut and you have enlarged the bore to readmit the liner (no fancy tools for that either - half-round engineering file and sandpaper on dowel will serve) and refixed that, you may need to improve the crack finish on the interior of the socket. I do this by filing a v-shaped groove with a triangular section needle file down the crack line to the bore step/socket shoulder and then fill it with more cyanoacrylate & wood-dust, just like top-dressing the outer surface, but in a somewhat wider band, then scrape & sand/file off the excess to match the curve of the wall. Seems to work well enough! Don’t worry about lateral pressure on the socket - no method of supporting the flute puts all that much pressure on it.

So far when gluing on wood blocks for replacement key-blocks I have used superglue - which has mostly worked fine, but you could use an outdoor PVA woodglue - just you have to clamp and wait for it to cure - not a problem. Cyanoacrylate has the advantage of not leaving much in the way of a visible glue line. I rough shape the block to be grafted before fitting and then use engineers’ metal files to finish the shape, not having any milling machinery and not trusting Dremel type tools. You can usually work out the correct profile by eye from the remains of the old block, the other blocks and by checking out pictures of related flutes, as Jon says. Plenty of Metzlers about!

Re: “key hinges”, not sure what you mean about bushings or washers - originals do not have such, nor are they necessary. When all is clean and ready to be reassembled you can put a drop of woodwind key oil on the key shank by the pin-hole before pushing the pin through.

If you have to replace any springs, again, see my Facebook album on my repair of iainbeg’s Keith Prowse flute.

Hello,
I have a nearly identical flute to yours. Mine is stamped G.J. Best London but has A.L. marks under the keys.
Nobody has heard of Best so I always assumed he was a dealer. If I can post pics I will. I am just struck by how muck this looks like my flute as in the blocks, keys, my short f block is even busted as well. And my flute plays really nicely in eflat with the slide out a good deal. Hope it plays well. Patrick

Thanks for all the tips. It is great to have this resource.

Update:
As can be seen from the photos, the foot joint is off cleanly. Just needed some humidification, twisting and a little judicious work with a sharp x-acto knife to remove the thread. I’ve tried to pull the slide out of the barrel (it is only 1/2 lined), with no success, even heating the assemblage with steam to free up the glue. Torquing it actually opened up the existing hairline fracture, so I band clamped it and hope that it will settle back to where it was before. I didn’t pull the exterior silver rings first, so perhaps that was compressing things too much to allow me to get the slide out of the barrel. I guess I could try to pop those off, but the crack is so narrow I’m now leaning towards just filling with thin cyano and wood dust.

Keys are all off (all marked on back “A.L.”) and silver tarnish cleaned. Some of the pads don’t look that bad, but I’ll still probably replace them as a set.

Most of the holes the keys pads fit up against look pretty good. Unfortunately the short F hole has a fairly pronounced scratch in the raised “rim”. Probably will have to do a fill job on that as well to prevent leakage. One of the other holes doesn’t have any rim at all (is that a problem?).

Next step is probably machining down the locations for the replacement block sections. On closer inspection I found that the “repaired” short F key blocks are actually brass screws that were tapped into the flute body then filed flat on the sides and drilled out for the pin. Any guesses on when the F hole got scratched? As noted there are some pretty creative repairs on this flute. I’m almost tempted to leave it as is :smiley: , but the short F wasn’t exactly moving smoothly.

Having some trouble getting a small scrap of cocus to make the blocks out of. Went over to the local Woodcrafters and they have never heard of cocus. They do have a wide variety of exotic hardwood samples, so I should be able to get something close if I bring the parts with me to match color and grain. Actually I’m not completely certain that it is cocus. Could it be rosewood?

It’s cocus. However, I think some categorisers of timber would include cocus amongst the rosewoods - and it can depend on whether one is talking botanically or in cabinet-maker-speak - not necessarily the same! You often see cocus flutes described by antique dealers as “rosewood” because it looks like what they are used to calling rosewood in furniture.

I do still think you need to extract that barrel liner as it will otherwise be much harder to seal up the socket part of the crack and it will be weaker than if you close the crack. Yes, best to take the ferrule rings off first - use a sharp knife blade to separate them from the wood where they butt up to it and to work them off - but be very careful or you’ll pressure chip the wood edge. If you get the barrel/liner hot enought he old shellac or glue will melt and you should be able to push/twist the liner out. Bottom line as I wrote previously, it doesn’t matter if you end up cracking the barrel wood in a second place while getting it off - if it starts to crack just try to encourage it to crack cleanly! It really isn’t a big deal to glue it back together and dress multiple cracks. I don’t think it will “settle back” as you put it because the gunk of old glue/shellac and verdigris between the liner and wood will have shifted. Don’t be scared of it. Get it out!

No surprise on the key stamps, then! When they’re cleaned up, would you mind taking a picture and posting it in the key stamps thread I started?

As for the tone-holes, yes, you’ll need to fill or file down that scratched rim. No, it doesn’t matter if a rim has been removed completely as long as there is an even, smooth bed for the pad and the hole edge is also clean, even and reasonably sharply defined. My R&R has smooth, slightly concave key beds and the pads seal on them every bit as well as any other design I’ve seen - domed, ridge-tinged, whatever. An alteration like the re-drilling/significant lowering of a key bed may, however, necessitate regulation of the key action - bending the key - to get the cup & pad to close at the right angle and with sufficient rise, and adjustment of spring weight to suit…

Update on repairs:

Barrel Crack Repair: didn’t end up pulling the slide, just used cyano and wood dust. Repair seems very stable and is virtually invisible. Not necessarily due to my repair skills, but more that the crack was only hairline and runs in an area of interesting grain to hide the fill. Wish me luck on it holding.

Block Repair: milled flats to accept replacement honduran rosewood (closest I was able to find to cocus locally) blocks. Not that happy with the looks of the short F blocks, which were the most difficult, and the color is far from a perfect match, but the keys do all seem to work and it is certainly better than before. Had to make a drill extension using some thin brass tubing to drill out the pin hole for the short F as my pin vise was too large in diameter.

Rewrapped Tennons: used heavy gage synthetic thread with Fred Bear bowstring wax. Seems to be working so far, though I did have to add some thinner rayon thread to make final adjustments.

Repadding: with leather clarinet pads held using shellac, though I certainly was tempted by the closed cell foam or silicon gel pads described elsewhere on the forum. This was the easiest part of the repair, though the final seating of the pads were a bit unnerving.

I’ve now oiled the flute and have started playing it in slowly. Looks like this one is going to be a winner. Pretty easy to sound now that I have the leaks plugged. Weight, even with fully lined head and keys is hardly any different from my keyless modern flutes. Must be the short foot. Doesn’t quite have the volume of my Seery Pratten, but I can see it holding it’s own in a session. For a total outlay of around $250 I now have a lovely block mounted 6-key conical flute. Might not be all that collectable, but works for me.

Now I just have to learn how to play with keys…

Still to come: final shaping and staining of the short F block. cleaning of the inside of the lined head (will probably use brasso once I can get the frozen cork freed up).

Thanks to everyone for the encouraging posts and the wealth of information available on this site for flute repair. I honestly can’t imagine being able to be this successful in my renovation without the forum.

:thumbsup:

can you draw our attention to some pics of the finished article? - im sure you will anyway.

Chris,

Sorry its taken me so long to post the new pix. Was having some major computer trouble (XP and service pack 3 it turned out), but I’m back in business now. Hope there isn’t any nettequit I’m messing with to revive one of my own old posts.

I’m still very happy with the Metzler, and play it preferentially over my other flutes.

I also enjoyed the minor restoration process so much I’ve let myself in for another e-bay special (the recent William Hall 6-key

). Will likely have to sell some of my other instruments to cover this once the boss finds out.


In any case here are the photos of the finished Metzler:

Note that the gouge by the short F key post was there before I started working on the flute. Cleaned up it really is lovely and has a nice strong reedy tone. I think I may have botched the short F key block a little as it is a bit loose, but it functions well enough and the looseness may have been a result of the former repair person drilling out the pivot hole in the key. If I get inclined in the future I may sleeve the hole, but for now it is fine.