I’ve been working all afternoon today, I’m trying to make five whistles this time. Three Low D’s, a Mid A and a fat High D, something like ultra-wide-bore or “Pony High D” ™
Tubes, fipples and plugs cutted at proper lenght. Paper tape is used to mark windows and holes.
Cutted and filed windows.
Made blades and fipple upper chamfer. Tested them, all sound fine. I used slightly different window height on the Low D’s to see how they differ later. I just glued the fipple. Tomorrow will start tuning and making the holes.
Everything took a while since I don’t have many powertools, made everything entirely by hand. Good exercise for the arms and shoulders sanding the windows and blandes
For me it is very interesting to see how you are making whistles. I will be very interested in the next photos. I’ve seen the finished product on the other thread, so this is really neat.
Holes measured and marked. It’s so simple to mark the exact place with the pen, and so difficult to make the hole right there
Drilling the holes. It’s not the best equipment, but it’s what I’ve got. :roll:
Finally, all holes drilled. Now it’s time to start tuning the whistles and make all the small changes needed. (that’s because I’m experimenting with slightly different hole location from what I used in the last whistle)
Ok, all whistles are now in tune, brushed and sanded.
Fipple plugs and “Rings of Balance” ™ ready to be glued. I’ve just glued the plugs (after testing them in each whistle to found the exact definitive location), tomorrow will glue the rings (to give the instrument a better weight balance).
Note that the plugs have a rough texture so the glue will hold better, but the windway is sanded smooth and covered with tape to protect it from being glued.
Today found that low height windows are a real pain to make. The plug location is incredible critical with this kind of window, if it moves just a little (like 0.5mm) from the correct spot, the whistle will probably miss a note (usually low D or second octave B or A). The result is a whistle that sounds with very little air, with a really mellow sound.
The one with the bigger window is quite a bit more chiffier and sounds more open/clear, also the plugs location seems to be not that critical.
Looks like the Pony Whistle requires considerable amounts of breath, but sounds pretty good after all… anyway, will let you know tomorrow when it’s dry.
I hope all the plugs remain where they’re supposed to be while the glue dryies… I’ll let you know how it goes tomorrow.
Did nothing yet, I’ll first finish the new whistles, which I made with a slightly different hole location, to see if that fixes it. So long it seems they are a bit better… anyway I’ll wait until they’re finished to test them thoroughly.
Most probably will keep the other whistle as it is now, the difference is of just a few cents (like 5/7) so it sounds good overall, I was just trying to understand how the Cnat fingering works to improve the design on the next whistles.
Ok, finally I had the time to finish them.
I had some problems with the one with the low window, had to fix lowering the blade and then using “blue tac” (wich is actually green) to extend the fipple a little. The others came out just fine
I’ve made the plug cut different from the last one, it is more comfortable now, and the whistle is lighter too.
I’m going to use a bigger diameter tube with smaller windows in the next batch
I have a question. If some of what you are doing is experimentation with hole placement, etc. could you work out those problems without doing so much sanding and hard work. Or even use PVC tubing which maybe is easier to cut? I don’t know the first thing about making whistles, so I am just interested in how you go about these things. I’m NOT making suggestions , just asking a question.
Yes I could, but I like to finish the whistles I start, being them good or not-so-good
This batch came out not-so-good, at least not as good as the last one, I’m pretty sure it’s because the windows are too big, so they need more breath… but they sound nice anyway…
I could use PVC too, but I don’t like it… what I really like is wood, but unfortunately I don’t have the neccesary equipment to make wood whistles, so I use aluminum which I’m really starting to love, since is so easy to work with… and quite good looking too
never played with metals in flutes yet, i look fwd to trying it soon!
wanna borrow my 1967 powermatic lathe? hehe. should only be about $5k to ship this beast
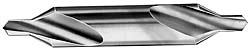
If you are having trouble with the drill point “walking”, try one of these:
It’s called a center drill, or combination center drill and countersink. They come in a variety of sizes, you probably need a #2, and they should only cost a couple of bucks. They are short and very rigid and will start a hole exactly where they touch the work.
BTW, really nice work - first class finishing job.
Matthew:
Thanks! You make beautiful instruments too! I really like bamboo, sure will make a bamboo whistle sometime…
Roger:
Thanks for the tip. Will try to find one of those. Anyway, my main problem is that the drill I use has the head a bit loose, so it moves away from center when drilling. I’ve got to buy a new one, surely a drill press, when I’ve got the money.
Thank you for sharing your whistle making experience -I am facinated at present with how such a simple piece of tubing can be made to sound to very - very - different with slight “tweaks” of design.
Please continue to post your efforts and experiments.