Hi,
I love the Tin whistle sound since I was a kid.
I tried to find a Low D whistle, but it was expensive to buy it + shipping to where I live.
So, I thought it would be easier for me to try and make one on my own.
But, I couldn’t find good instructions and measurements to the length of the whistle and placing of the holes.
I have a store near me that sells aluminum tubes really cheap(25mm diameter of 1 meter for $9.5).
So how can I start, and what do I need to know.
I also downloaded TWJCalc_2.10 - but I don’t understand all the numbers, scales, tube size, and more.
Also, I read notes and I have a cheap tin whistle in D.
I just want a playable low D, not the best. Just want to enjoy playing it.
Thank you for all your help.
I also started by using the low tech whistle guide linked above. Loads of good information in there on the fundamentals of how whistles work.
Another helpful link, is this calculator. I still use it for all the whistles I make. I tweak all the sizes and locations but its still a great base. This will help because your aluminum tubes will likely be different size than the tubes in the low tech whistle guide. https://www.music.bracker.uk/Music/Whistle-Calculator.html
If you don’t really have good tools, PVC is a lot easier to use. With aluminum tubes, you usually need a lathe to fine tune other tubes to either fit outside, or inside your pipe, to make the windway. With PVC they already pretty much fit over each other, so its easy to have it bend a little to fit snugly (what he does in the low tech whistle guide).
There are ways to flat hammer the lip down, and only use your 1 aluminum tube and not need others to fit. But I’ve had significantly less success with this method and have no good guides on it. So I recommend sticking with the above method.
Every dimension of the whistle effects other things. One of the most important is the inner bore diameter. On the low tech whistle, it gives dimensions for a 22mm inner low D. As you make the bore larger, the length gets shorter, and the hole positions and sizes can change. On hole position and size, these can also be changed. As you make a hole larger (keeping it in the same spot), the note will get sharper. And as you move a hole closer to the mouthpiece, the note will get sharper. So to counter this, you can move a hole closer to the mouthpiece, and shrink it the right amount, and it will play the same note as the larger farther away hole.
Another thing, how hard or soft you blow effects the tuning of the note. You can see this by playing to a tuner if you dont have a good ear. As you blow harder on a note, it will get sharper, until it breaks and jumps and octave, where blowing harder will then keep making it get sharper. So some different guides could have different dimensions based on how hard one should be blowing to make that note in tune. What should be constant between any good whistle, is the blowing curve. One note you shouldn’t have to blow hard, then one soft, and be all over the place, to make it play in tune. It should be a smooth curve.
So to try and piece this all together. The numbers on the low tech whistle guide, will only be really accurate if you have the same size tube as him. You can use a different size tube. But you may need to adjust the length, and hole sizes, to play in tune. I love the Bracker whistle calculator, because you can adjust everything. You can put in the inner and outer diameter of your tube, and it will adjust for that. You can also use it to experiment without having to actually make anything. As you move the holes, or change their size, the other changes. This can help show how moving the holes around and changing their size effects each other. On low whistles, I usually always move the last 2 holes to be closer and smaller to make reach easier, and closer match whistles like MK.
The low tech whistle guide explains a lot of how whistles work, so its well worth studying, because it has a lot of this kind of info in it.
You mentioned which tube size you should get. If you go with the aluminum tubes, I recommend the 25mm. Its wall thickness will effect how big the ID is. But a lot of makers use 21-22mm ID for low D’s. Note though, that if you do get aluminum, you need to be able to make the windway. So if you cant get a pvc tube or something that fits over the outside, you may not be able to make it without more tools. And buying more tools costs more than just buying the whistles usually haha. This is one of the advantages of starting with PVC. Theres usually many sizes, so you can easily get a main size, and then 1 size up to fit on the outside to make the mouthpiece and optional tuning slide.
This is obviously a lot to take in at first and may feel overly complicated. The best thing to do is just try it out, you will probobly learn a lot. Using pvc is very cheap and easy to work with, so its an easier way to start, but you can skip that and go to aluminum if you want.
There are also these plans for a copper whistle and possibly using standard availale piping, but I have no idea how hard it would be to make a whistle this way, or how good the design is:
Ah yes I have seen this before when I was originally looking up how to make whistle guides. It would work. You can also do the same thing or similar without even needing the outer coupling pipe. Which was the style of one of my first metal whistles I made. But it came out pretty bad. Which doesnt mean the design cant work. But one of the main issues, is with the D shaped windway it uses. To make the windway wider, you have to also make it taller. Because to make it wider you file the block down more. So its air efficiency isn’t good for low whistles that need a wider windway. And as you hammer the lip down more, it seems like it needs to have a wider windway. So there’s a lot that can go wrong trying to get them to match up. So I moved on to using over or inner tubes to make windways which was easier to get right.
I’d love to find more info on how to make Goldie or thunderbird style whistles. Which is pressed lip done right. Theres much less makers who use those styles. Which makes me think its probobly harder to do. but I’d still like to try it out if I could.
Thank you all for your help.
I am glad to get your help, and I understand it much better now.
I will see what they have in the store.
I know that they have a 25mm aluminum tube and a 30mm aluminum tube that fit tight on it.
They also have a 19mm aluminum, tube but it is smaller than the inside of the 25mm.
I understand the body or the tube much better.
Now, I need more help to understand the mouthpiece and the fipple.
Glad to help out. Is there anything you need specific help on for mouthpieces? Most of what you need to know on them is covered in the low tech whistle.
For the aluminum tubes, if the 30mm fits snugly over the 25mm then that’s very good and you should be able to make a windway out of that, the same was as in the low tech whistle guide.
One important thing on windways, is that your tube sizes can effect the windway dimensions. If you put a tube over your 25mm tube, and the 25mm tube has a wall thickness of 3mm, your going to get a windway height of 3mm+ (+ being if you sand the block down at all to make it lower than the lip). Because the windway is the cutout in your 25mm tube, with a block inside and a tube on the outside. A 3mm windway is very tall and will use a lot of air. This is an issue with a lot of PVC whistles. Because most pvc pipes are fairly thick. Professional makers use metal lathes to modify tubes to be the right dimensions, to get the windway height they want. So when you don’t have a lathe, you need to try and find ways to not need one. Like using a thinner tube thats the wall thickness you want. And then finding a plastic tube or something that can be cut ant bent over that to make the windway. Similar to this : https://d10j3mvrs1suex.cloudfront.net/u/77952/8e737e926e3a4048947dccbbac0ad22999ff8cc8/large/rifleman-01.jpg/!!/meta%3AeyJzcmNCdWNrZXQiOiJiemdsZmlsZXMifQ%3D%3D.jpg
While I wouldn’t worry that much about windway heights at first, if you can get a pipe between 1 and 1.5mm you will be much better off than if its thicker.
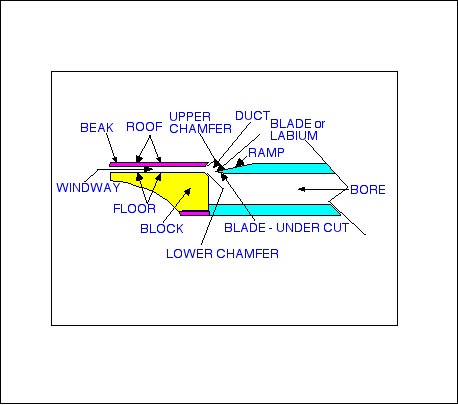
On the images of terms, the lower chamfer is extremely important on low whistles. Which he mentions in the low tech whistle guide. I missed that the first time and had big issues. Everything else you don’t need to worry that much about. You can not make a lip blade and it will still work.
the beak material is important. I once had a Sweetheart 100% rosewood whistle, a very fine whistle overall, no complaints, but being 100% rosewood, after playing it just a couple months I noticed that the beak area has lost it’s excellent finish and was starting to look like it was breaking down, likely a combination of some slight tooth abrasion on occasion, plus saliva starting to act to break down the material? That really made me wonder how long wood mouthpieces can last on any wind instrument. Obviously, mouthpieces made of Delrin or metal or plastic are not going to suffer such wear from saliva or light tooth pressure, for years.
the “chamfer” angles affect how the air stream widens and is aimed, as it leaves the windway and then approaches the blade and the tube. This makes me wonder about the direction of the main airstream. I’d say 100% of the whistles I’ve ever seen, have a windway that is perfectly parallel to the length of the tube, so I’m wondering if there is any benefit to putting a slight angle to the airstream as it leaves the windway, either upwards or downwards, relative to the length of the tube. For efficiency, the blade would still have to be close, but would it affect the strength of the first octave or high second octave/third octave if the airstream was slightly angled up or down relative to the length of the tube, so that the airstream hit the blade (which might also be adjusted in design) at a slightly different angle. Maybe chamfer angles in that area, are enough, and the windway should remain level.
would there be any benefit to putting the blade somewhat lower into the bore of the tube (and therefore also adjusting the windway position), instead of always being basically at the top of the unaltered tube?
Looking at pictures of Goldie whistles, it looks like 3 sides pressed flat and square (or for home make hammered on a square anvil ?) , then cut out window and file down edge of lip… but I wouldn’t know if the lip underside is flush, if there is a release from square section to cylindrical etc.
@ Harel
The trouble is that it is unlikely anyone is going to describe the making of the mouthpiece better than you have in hand as designs, because there are so many parameters that come into play. So people might give tips, or advice to a problem, but there is no single answer to how the mouthpiece should be. Really I think reading up and then going ahead and trying to make, then asking if you find difficulty is probably better.
Here are a few links you might already have:
This makes it look easy… so in reality it is not too hard either ?
That really made me wonder how long wood mouthpieces can last on any wind instrument.
More than a lifetime, assuming the instrument is made well and you aren’t chewing on it. Not my opinion, historical fact based on plenty of existing recorders.
I made that diagram more than 20 years ago because there was so little information available.
I create a book called “Tin Whistle Maker’s Anthology” which has been on Amazon for a number of years.
I’m thinking about doing a revision on this year some time.
Just a little tip, look at the two measurements usually used to define ally tube, the first is diameter (25mm is good for a low D) and the second is wall thickness. You should really be looking for a wall thickness of somewhere between 1 and 1.5mm. The same applies to any other material you might consider, look for the thin walls. Do you have access to an ally retailer? They may be able to show you thin walled telescopic tubes.
