I like to make musical instruments so I decided to make a penny whistle. I used TWCalc because I don’t have any metric bits and all the plans I found were metric. HB Flutomat was the algorithm I used and my whistle holes are coming out at least 2 sizes too small. In other words, a 5/32" (3.97mm) hole has to be drilled to 3/16" (4.76mm) to even get close. Unfortunately I’m to the point where I don’t have enough incremental sizes and will have to jump from a 1/4" to a 5/16" without knowing if that will be too big. To hit the notes I have to blow pretty hard, much harder than my Clarke Original D.
CPVC pipe, 12mm ID, 2mm thick wall, embouchure is 8mm wide by 4mm long by 1.5mm high, airway is about 25mm long, whistle is an Eb.
Here are my calculations. I did everything in metric but converted my drill bits to mm. Are my settings out of whack or should I be using a different algorithm?
I’ll stay away from discussing the HB flutomat or TWJCalc calculations. Hans and DrPhill can speak to that better than I can. But I will say that it is unlikely that the calculator is at fault. I did do a validation of DrPhill’s calculator at one point.
I use a combination of TWCalc and my own spreadsheet for calculations. Remember that calculators describe a particular perfect world. We are not, as builders that perfect. Calculators have “correction” values in them which are adjusted to a particular design and builder. But they help us get darned close when we make the first whistle and reduce the whistle waste. ANd in the case of DrPhill’s calculator it helps visualize the hole layout too.
I want to encourage you to keep at whistle making. But here are some general observation I would make. It is not strictly a formulaic endeavor. Measurements do not tell the whole story. There is a lot to get right to make a good whistle. You should expect that you make some trash whistles at the outset. I have a bin of “mistakes” in the shop that I use as a reminider of what I have learned. But if you rationally examine the failings of each whistle you will eventually get to a place where things are all balanced out and the whistle works well.
There is nothing wrong with the dimensions you outlined of you head and components. I also use 1/2" (nominal) CPVC for my Eb’s. I use a 4x8mm window too. My windway is ~25mm long too. They work well and play easily. But I do reduce the windway height down considereably from the wall thickness of the pipe. You say your windway is 1.5mm high, if I read you right, and that should still be workable. I make D whistles with heights from .75mm to ~1.7mm for various playing styles and voicings.
If the whistle is hard blowing, we should examine the head first. So what is your head design? Pictures could help here. What is the plug made of? How is the exit end of the plug shaped? Do you bevel or round the plug at the windway exit? What is the ramp angle? How long is the ramp? How is the labium edge finished - sharp or blunt? Do you undercut the labium? What is the alignment between the floor of the windway and the labium edge? That should get us started. Without knowing more I am assuming that you need to work on alignment and finish of the plug and labium. I’d suggest you get the head sorted out first before you dive into the tuning. But we can still talk hole positioning a bit.
I like to use a set of bits which increase in size by 1/64" increments. I calculate most of the dimensions in millimeters and then toggle back to inches for the holes. Hole sizing can be done a couple of ways though. You can (1) calculate to figure out the best hole size or you can (2) calculate using your available bit sizes and determine the best position for the hole. You are doing the second method. You’d need more bits to use the first method. The hole size you use should just exceed the size needed to allow the second octave note to speak easily and as strongly as those around it. The cut-off frequency is used to predict that the note will speak easily. Pick a bit which gives you a good cut-off frequency for each hole. The relationship of the cut-off frequencies across all holes predicts the strength and balance of the notes and is illustrated in the diagram you show. An ideal graph would be flat (fat chance that ever comes up). And it looks like a workable layout to me. I might make the BH1 hole larger.
So how are you drilling the holes? What kind of bits do you use? How do you finish each hole? Do you de-burr each hole? Do you undercut each hole? That should get us going. So let’s start there
Pics, I’ve been experimenting with different plugs (round and flattened) and head shapes. I haven’t done any final trimming on the mouthpieces because I wanted to experiment a bit before committing :
The bottom one in the pic above is easier to blow. I don’t have to blow very hard to get sound from either whistle but I have to blow hard to get the right note on the top whistle. The bottom isn’t finished, I drilled the F hole too big (it’s a little sharp) and haven’t decided what to do with it. I might try drilling the other holes and see how it turns out, or I could chop it off and make a high G.
I take the cpvc and drill out the head end with a 1/2" drill bit so I can fit a 1/2" dowel, this also thins the windway down from 2mm to about 1.5mm with a round wood plug. With the wood plug with flattened tops the windway opens to about 2mm. Not sure of the windway angle, I just eyeballed it. I have tried both rounding the plug on the exit side and leaving it sharp, both produced different results based on the positioning of the head piece. Angle on the mouthpiece is 30 degrees, in the future I’m going to cut them closer to a 45.
The labium is just a little dulled, I filed it then ran the file over the end a couple times to blunt it just a little. I did not undercut it at all. I left my metric ruler in the shop but I’d guess the labium ramp is about 3.5mm long. The labium and floor are parallel.
Drilling
The bits are just normal twist bits in a wide range of sizes from 1/16" to 1/4", then it jumps to 5/16, 3/8, & 1/2. The bits leave the holes pretty clean but I have needle files for removing the flash and smoothing the sides. Tops of the holes are not chamfered although I wondered if that would help. I expected to have to tweak the holes but being 2 sizes too small took me by surprise.
Thanks that might help explain things then. How far into the tube do you drill out the pipe? If you stop before the bottom of the labium then the windway will be higher than the bottom on the labium edge. Of course you could then undercut the labium to bring the edge up but you might then enlarge the length of the window. It’s like a balloon, you push in one side and the other side sticks out.
Everything in the head has to work as a system. There are lots of ways to do things but in the end your goals are striaghtforward. You are trying to split the air stream coming off the windway with the edge of the blade to create oscillations in the window. If the blade is too low or too high in relation to the air jet you will not get the proper oscillations. You want the bottom of the blade just a hair above the windway floor or else use some other geometry to split the jet of air. I would suggest you use the type of mouthpiece collar shown on the top since it increases the depth of the window and should help stabilize things.
I drill to 4mm of the labium so that the plug dead ends leaving a 4mm hole. My only other choice was to somehow cut the 1/2" dowel down to 12mm without a lathe. I’ll file a slight undercut to the labium and see if that helps.
That is not necessarily held to be so for whistles used for Irish traditional music. It is of course a matter of preference and what voice you want to have for your whistle.
Conventional wisdom tells us a sharp blade produces a tone with fewer overtones - a less interesting tone to many. A less sharp blade is held by many to produce a more complex and therefor more interesting tone. And other design factors will contribute as well.
It’s easy enough to experiment with to reach your own conclusions. Buy some pipe.
Okay, I worked and worked on the Eb whistle but it’s a lost cause. I’ve shaped and reshaped the blade and it’s still hard to blow. I can’t get the holes large enough to hit the right notes so they must not be in the right places. Maybe after I have more experience I’ll come back and revisit it.
I moved on and started on a C whistle. Here is what I’ve done so far. I shaped the blade, inserted a wood block, put on a head, then started sawing the length down until I could hit a steady C on a tuner app. I then punched the measurements taken from the whistle into the calculator and the length (307mm) perfectly matches the HBFlutomat calculation. So I’m encouraged.
I left extra space on the mouthpiece this time and haven’t trimmed it yet . Window is 4.5x8mm. Windway is about 28x8mm; height varies to about 1mm on the sides and about 0.5mm in the center. I can easily hit the lower register and it sounds good, just a touch breathy; but I’m struggling to hit the high C.
Here are my specs, any advice before I start drilling holes? (I’m getting wiser, asking for advice before screwing up!)
Yeah, okay, I can respect that. But, who said I didn’t reach my own conclusion? I make whistles too. Anyway, from what I’ve found on mine, I can get a nicer and louder tone with a sharper labium, but that is just my preference. Also, my whistles seem to have a very short slope on the blade, so that probably is a rather large factor. Oh, and if you get a chance, you might try a slightly different pipe. I haven’t tried this for high whistles, only with low whistles, but I found, at the hardware store, some thin-walled PVC pipe (thinner than CPVC) that has the same O.D. as the schedule 40 pipe. This also means a larger I.D., but I’ve found it makes a nice loud low D whistle for the amount of air used (although, they still take quite a bit more air than professionally made whistles, but that’s to be expected). The whistles I’ve made out of CPVC seem to take more air for their volume, as the windway is taller, so I thought I might bring that up as an alternative. Not saying you should give cpvc up and go to that, I’ve just found that it works better for my purposes. I hope your next one works! (sorry, I have no advice for the holes )
I bought more pipe to experiment with today at Home Depot. Their cpvc is $2.40/8’ where Lowes was $3.50/4’. The HD cpvc is a slightly different size so we’ll see how that works. I also bought a piece of 1/2" thin walled black abs even though I’ve read it doesn’t work as well but I’ll give it a try, maybe for an alto or low whistle. Didn’t find any thin walled pvc except the flimsy stuff they sell for sinks; haven’t checked Ace Hardware yet. While looking through pvc/cpvc specs I found that some are designed to be acoustically absorbent for quieter pipes, I imagine that might put a damper (hardeehar) on the sound.
Do you drill all six holes (small) first then go back and size them or do one at a time? Have you tried filing down the top of the windway to reduce it’s height? I bought a pipe connector so I can try and make one really good mouthpiece and switch it out between pipes.
I do believe Lowes was where I found the thin pipe. And when I mean thin, I mean like 1/16 of an inch thin. Anyway, I know they have it at Ace, as that was where I first found out about it, but I actually bought some a couple months later at Lowes. I still have a bit left too. Oh well, about what you said about the acoustically absorbent pipe, I did not know that. That’s really nice to know, thanks!
Personally, I drill all of the holes first, and then size them up, but I’ve read it’s better to do otherwise, I just mainly do that so that I can get a feel for the grip and placement of the holes, before they’re final size. So, if needed, I have some room to move them this way or that way a little bit, as I’m tuning.
What do you mean “filing down the top of the windway to reduce it’s height”? If you mean like recorder, where there isn’t a windway cap, there’s just the one pipe that a windway is filed into (directly over the fipple), then yes, I have tried it. I’ve only done it successfully on bamboo (which weren’t very good pieces, so I only made the head). I did try it on normal PVC, but I found that I didn’t have a course enough file, so I gave up and just started chiseling it out, which worked phenomenally, until the chisel went crooked and cut the PVC all the way through like butter, ruining the whole thing. After that, I just used some scrap bamboo I had laying around. They all work and have a really nice sound, but it was hard to shape the fipple to go into the non-symmetrical bamboo, so they’re not airtight at all. After that, I just haven’t had the time or material to give another more educated go. But it works, and if you can do it well, it’ll make a great whistle.
The conventional wisdom suggests that you first do as you have done and get the sounding length right - make the pipe long and whittle it down until you get your fundamental note. Then start drilling the bottom hole a tad undersize and bring it up to pitch by enlarging it at the top. Then do the same for the next higher hole until you are satisfied and so on. Once you have a good design and can replicate it consistently you can drill them all at one go with no problem.
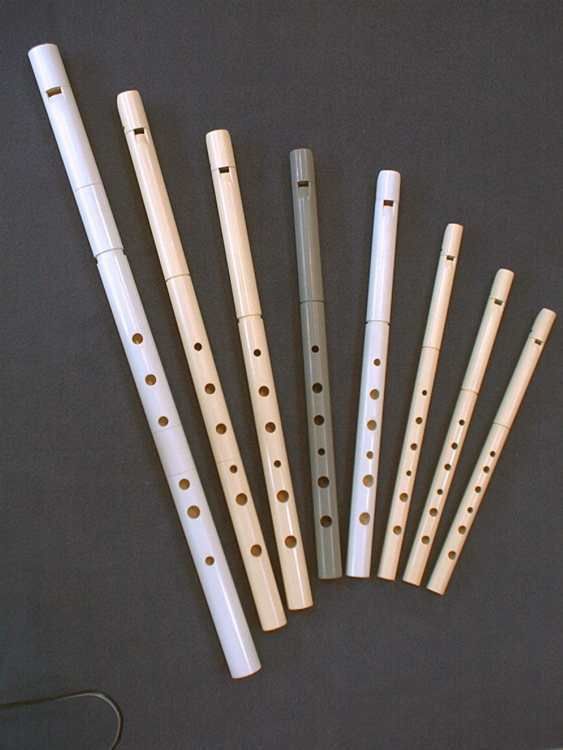
Yes, I did try that back in the early days to get control of the breathiness. And you should give that a try too. See how you like it. I also used a heat gun to form the head in a manner similar to what Tony Dixon does. Looked kind of like an ivory Overton when finished. Work outside if you try that. Another method is to add material inside the mouthpiece collar along the top of the windway to reduce the height - tape, strips of plastic, etc. I quickly came to the conclusion that another method was needed to really control the height of the windway so I got a lathe. These are some of my pvc/cpvc whistles from those days.
I can easily control the windwayy height by splitting the wall thickness with the outer mouthpiece collar in any ratio I’d like - hard-blowers, free-blowers, and the Goldielocks model.
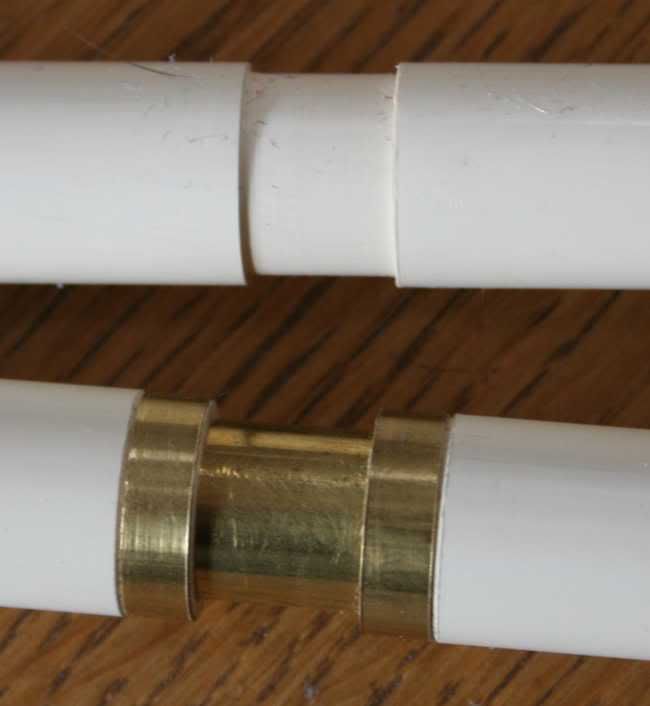
That’s a good strategy. Placement of the joint along the pipe can become a tuning issue because of the thickness of the pipe wall. It creates a point where the bore expands. So be mindful of that. If you examine a few nice whistles you will see that they either use a very thin tuning slide material like brass or they thin the pipe tubing down (two of my own examples are shown below)
and they generally place the joint where it will have least effect on the tuning - flow noddes versus presure nodes within the pipe. Look at pictures of some whistles and you’ll get a sense of where along the pipe to place the joint - it’s a proportional thing after all. And you can use 1/2" copper pipe connectors for the joint sleeve if you want to add a bit of color to the whistle - works at the mouthpiece too.
Concerning the thinner walled pipe - if you have the inclination to do so, then try every type of pipe you come by. You never know what you will like best. Guido Gonzato does use a thin walled pipe and he gets nice results. I have a couple of his whistles here and they play very well.
And have fun. I’d issue my usual whistle making challenge “betcha’ can’t make just one!” but you already gone past that.
Thanks to everyone for the advice. I haven’t drilled the holes yet on the C whistle, I think I’m a little nervous. But the whistle blows well. Playing around with it as-is, I can hit the higher and lower octave with little effort. After drilling, hopefully I can say the same. After building an Aeolian harp and a few strumsticks, the whistles are the most challenging instrument yet and here I thought it was just a pipe with some holes in it. Maybe if I can figure out this whistle calculator I’ll have more success. It kind of baffles me that twcalc and flutomat give entirely different lengths for the same whistle. It makes me wonder if I’m using the calculator correctly.
You can take the view that making a whistle is rocket science and takes a lot of calculation and physics (which it does if you want to embrace that) or you can just go into it wide-eyed, really and truly believing that it is just as pipe with six holes in it (which it well and truly is at the end of the day). Or you can take any view in between those extremes.
The calculator, as I said earlier, describes a perfect view of the whistle. And furthermore, it describes someone else’s whistle, using their own end-correction values (aka: fudge factors). It doesn’t make whistles. There are many reasons why a whistle does not match a particular calculator’s results. Here’s how I view it. Whistle calculators are like the Pirate’s Code. They are more like guidelines than rules.
You have to make a pile of trash to make a good whistle. Some folks will make a bigger pile than others. But in all cases, once you make a good whistle, you will be able to make more good whistles. It’s a pleasant past time making swarf and sawdust - just don’t breath it in.
And there is no reason that you have to use a whistle tone-hole calculator to make a working whistle. Ugg didn’t use one when he made the first whistle sitting around the campfire long ago. And we have all been chasing his dream ever since. Trial and error works - just embrace the errors as learning experiences. Emulating classic, working deisgns has merit and a long history. Why else would flute makers have to conjure up the ghosts of Nicholson, Pratten and Rudall to sell a flute? Oh yeah, then there is this method. It may seem laughable at first but it has lots of merit.
But in any case, keep at it. Have fun. You’ll get it right.
Hi, I wrote TWJCalc and thouroughly endorse what others, but especially Feadoggie, have been telling you.
First I have to clarify something - I do not understand the maths involved in the calculation. Or more accurately I do not understand the theory behind the maths in the calculation. I ‘borrowed’ the algorithm from two places: Flutomat (by Pete Kossel IIRC) and TWCalc (Daniel Bingamon). I think there is a very small error in the Flutomat algorithm, but it is really insignifcant.
I wrote TWJCalc to answer the question ‘how are the hole positions and sizes related’, and since I am visually oriented I wrote a program to display the holes as the parameters changed. From there it got a bit out of hand…
Now you need to understand that the calculations are not accurate predictors - not like a metre rule, or a shop till where there is a correct answer that pops out. The calculations are more like a model of reality. Within limits the model behaves roughly like reality - it makes statements like: “increasing this hole diameter means it needs to move down the whistle, and that the next hole up gets smaller”. It does not make statements like “increasing this hole diameter by one millimetre will move the hole 0.75mm towards the end”. It is not that accurate. In order to increase the accuracy there are several places that ‘fudge factors’ are applied, but these are derived from reality (making whistles that work and measuring them) rather than from theory. There is no guarantee that the fudge factors are meaningful in a different whistle geometry.
Now if you are making a range of whistles with closely related geometries it would seem reasonable to propose that you could fine-tune the fudge factors so that the accuracy of the model increases. I believe Hans Bracker has done a lot of work on this some of which made its way into TWJCalc as HBFlutomat (Hans’ fudge factors at the time applied to the flutomat algorithm). Hans’ whistles are highly regarded, so maybe this approach worked.
I used TWJCalc to guide me in making a (just one ) whistle (bass A). I found the calculations consistently out - ie each hole was off by approximately the same amount. This consistency indicates that the model has some merit if fine-tuned.
Sorry for the essay - I have added little really to the discussion, except to reassure you maybe that you are striving for an accuracy which I do not believe the whistle calculators will yield. You may be interested to try some of the different algorithms available, or even use the scripting calculator to fine tune your fudge factors (things like ‘end correction’).
Haha! I’ve never thought of that, it’s a pretty good idea! There’s only one problem with it, and that’s that your pipe has to have the right ratio of length/diameter for it to work properly, but other than that, it’s genius! I’ll have to try that.
The C whistle plays okay though there is still a little fine tuning with needle files necessary as several holes are just a hair flat. The whistle is much breathier after drilling the holes and the upper register on the E,F,G & A holes is difficult and unstable. It’s not very loud but that isn’t a problem as I just play it around the house. It is definitely playable as-is so long as you don’t need many high notes. I’m hoping a bit of tweaking can improve things.
Some lessons learned: Drilling the first hole sharpens the base note just a tad. Next time I’ll leave a couple extra millimeters to the length to compensate, I can always shave it down. The thickness of the pipe, 2mm, is definitely working against me as the more holes I drill the previous holes tend to go sharp then flat. I’m going to experiment with countersinking the holes just a little and see if that helps. The new pipe I bought is slightly (.25mm) thinner than the cpvc I’ve been working with. With this whistle I trended toward small holes because I was afraid I might have to drill them out larger like last time but the calculator put me right in the ball park so next time I’m going to trend toward larger holes which should help the volume a bit.
Thanks for the advice, all of it has been helpful actually. Once I get it tweaked a bit I’ll post a sound file.


 )
 After that, I just used some scrap bamboo I had laying around. They all work and have a really nice sound, but it was hard to shape the fipple to go into the non-symmetrical bamboo, so they’re not airtight at all. After that, I just haven’t had the time or material to give another more educated go. But it works, and if you can do it well, it’ll make a great whistle.
 ) whistle (bass A). I found the calculations consistently out - ie each hole was off by approximately the same amount. This consistency indicates that the model has some merit if fine-tuned.