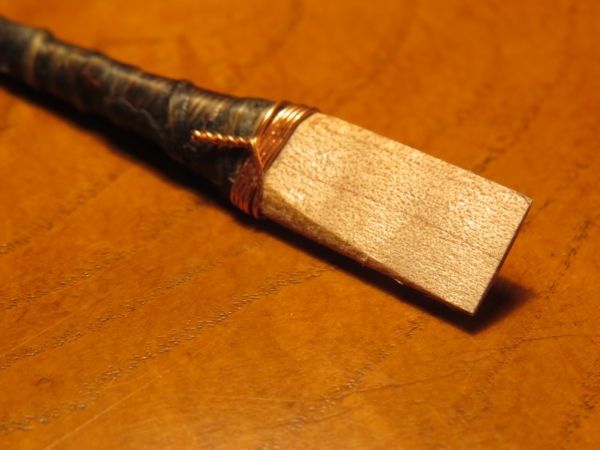
Spruce Chanter Reed (demo)

Just my limited and personal journey with wooden reeds:

I just messed around with wood reeds as an experiment. I made them for kicks. Nothing serious. I was really surprised when my second reed sounded decent but not fully in tune. I made a couple more and did some experiments sanding the slip etc. I plan to experiment more in the future. To me, I did notice that my redwood reed was much more stable and consistent than cane in dealing with humidity swings.

I don’t feel there is any magic voodoo to making a wooden reed. Just keep the grain consistent the length of the slip. The wood I used, I consider soft. I was not hot on using spruce. I personally am wary of pine. I know they make instruments from spruce. Though, I will try it in the future. A friend told me redwood worked well. The mill I purchase lumber from has great red wood. I bought some and re-sawed it up. I would never split the stuff. This is too fiddly for me and I can choose nice straight grained redwood at the mill. I prefer to re-saw everything on the table saw. Much more slips and much more efficient in regards to time and producing a volume of working slips. Provided you have the tools, I don’t really find redwood much more difficult to work with than cane. I cut my slips close to what I need and gouge like a normal reed, leaving just a bit more material. I get the final curvature with sanding blocks. I gouge a little off the top sides and sand down. Redwood is much easier to sand than cane, so I don’t mind having the sandpaper do extra work!

This is my very limited experience so far and just represents an experiment delving into wood. So take everything I say with a grain of salt. I am really down with redwood reeds. I am battling illness right now but I plan to make several when I feel better. These wooden reeds have the potential to rock IMO.

BTW, thanks for the input Geoff!

  • Jason

That brightened it considerably!
#SimplyAmazed

great stuff!

Don’t bother untying it now, you won’t get a lot of improvement.
maybe in a year or two if it gets dull again, or when you have
two better reeds.

If you want more improvement try Geoff’s suggestion.

Try the wetting trick with the 1500 grit on the next one you make,
just before you tie.
use the same cylinder that you do the regular sanding on.


You don’t need much water, just enough to dampen the surface,
and raise the damaged fibres.
The less water you use, the quicker it will dry.

I’ll second Brazenkane. Hats off again.

Brazenkane: what species of maple do you use?
I found this thread in which you nominate curly maple,

https://forums.chiffandfipple.com/t/wooden-chanter-reeds-soundfiles-froment-hunter/64899/1

but http://www.wood-database.com/ says:

Curly Maple is not actually a species, but simply a description of a figure in the grain—it occurs most often in soft maples, but is also seen in hard maples

The pic Joseph Sampson posted looks a bit like rock maple (Acer saccharum) to me, but that is the only northern hemisphere maple I have experience with.
It is also probably the easiest to get hold of here in Australia.

I guess it might be easier to look for something with similar density/hardness/elasticity

BzzzzT: best wishes for your health and the redwood experiments.

The thing that concerns me about pines is that true pines (genus Pinus) tend to have large resin canals.

Good advice, Don, on leaving the spruce reed alone.

Here’s one of Brazenkane’s maple reeds. You can see a couple large flames (curls) across the middle of the scrape. Had to get the light just right for them to show at all.

To my ears, the maple sounds somewhere between the my spruce and my cane…and more towards cane. I’ll try to get a sound file up soon.

Bzzzzt…now I’ll have to try cedar…and I just happen to have some really straight grained pieces. Redwood…I’ll have to buy some.

Thanks Lorenzo,

for posting the pic of the curly maple reed and the description of how it sounds.

I was impressed the sound of the Froment chanter in the jig clip on
the thread linked in my last post. I assume that was a Brazenkane maple reed.

I was probably getting ahead of myself though.
Better to make a working reed or two from something easier,
like spruce before trying more demanding woods like curly maple.

In my experience curly grained woods are tougher, less likely to split,
but harder to work: more difficult to cut straight, tear out, sand to a uneven, lumpier finish.
I don’t know how they influence tone.

Curly maple like Brazenkane uses is hard to source here,
I would probably be better off trying a substitute with similar density/hardness/elasticity
when I get to that stage.

Best of luck with the cedar reed project, let us know how you get on.
A soundfile of the improved spruce reed would be interesting as well if you can manage it.

thanks again,
Donald

I managed to buy these about a week or so after my last post:

http://www.ebay.com.au/itm/64b-3-x-USA-CURLY-BIG-LEAF-MAPLE-WOOD-TURNING-CRAFTS-30-DAYS-TO-PAY-/251867725489?_trkparms=ao%3D1%26asc%3D20140723144413%26meid%3Dd207cb00a2f940bd8f3843c6e29d75e4%26pid%3D100275%26&_trksid=p2047675.l2557&nma=true&si=t58F3mf2H0r6V%252BovWQvxYEJrQI4%253D&orig_cvip=true&rt=nc

The last pieces he had, you never know your luck I suppose.

I will be making a few softwood reeds before I try the curly maple,
but it’s good to know I have some when the time comes.

cheers to all

Has anyone else tried making spruce reeds? I’ve just made another one out of Engelmann and am liking it better than the first. It’s brighter, perhaps the wood is not as soft as the other piece–which sounded kind of woody. This one has all the tonal colouring off the knee you’d ever want. Spruce produces a really solid pitch for each note, the octaves are also extremely true to each other. By solid, I mean it can take greater bag pressure than cane and still remain totally stable. You can’t get the bell note to dip no matter how much pressure you give it. Same with the back D. Pretty amazing, really, after playing with cane all my life.

A friend of mine has an entire woodshed full of cut and cured Engelmann spruce. I had fun looking at the tight grain at the ends of the cut blocks. He says I can have all I want, so think I’ll split a few wedges (quarter sawn) out of the better blocks.

I’ve also just purchased some really fine straight grained redwood. That’s next. I made a bass drone reed out of it the other day just to see how it sounded. I drilled the hole, friction fitted the rough cut reed block on a chainsaw file, then turned (thinned) the outer wall by sticking the round file in an electric drill and holding a flat file against the rotating surface. Worked like a miniature lathe…almost. :slight_smile:

I am about to make a few of these, but am going to cheat! I will use some close grained Italian spruce, originally intended for viola bellies, but will cut off the thickest section, turn it round on the Boxford, then bore and ream it out to the size of cane I use, then treat it as a cane tube.

I’ve got several things going on at the moment, so it will be a little while before I get round to it, but I will report back.

n.b. Plaques - you might find it easier to use a bassoon plaque rather than an oboe plaque. They’re a bit bigger and help to protect the reed edge better. I got mine from Howarth’s in the UK (available in plastic and ebony).

Mike

I had to make sure I knew what Italian Spruce was as we’ve been discussing several different types. This is interesting: The Truth About Spruce - all spruce in Europe is likely the same species, just known by different names, and grows slightly different in the various climates and elevations.
http://www.lutherie.net/eurospruce.html

I think the hardness/softness of any given spruce is the trick…and this varies within one tree–all the way from the outer growth to the inner, from the base to the top.

Averages here: http://www.wood-database.com/?s=engelmann+spruce

The stuff I will be using is Picea Abies, which grows all over. This I use this for violin family instruments after a “dunk test”. The lighter the wood the less it sinks, and I aim for 65% maximum submersion. This should give a good belly, so long as it flexes and twists correctly (for a fiddle) but for pipe reeds it’s behaviour will be different. I’ll let you know.

Some of this wood was cut 60 years ago, so is well mature now.

This would only yield two slips of the correct orientation, and a lot of good wood would end up on the floor.

If you like, the “correct” orientation is such that the ray cells are prominently visible on the slip. I think it makes more sense to work up a block of wood as long as the desired slip, a little thicker than the desired width of the slip, and then cleave it to establish the plane of the grain. You can then round one edge of the block such that it approximates the outside curvature of the slip you want, or would expect to be working with on an analogous cane slip, and then slice it off with a saw. This leaves you with a slip to work with much as you would work a cane slip, and a block ready to prepare the next slip from. I also work from spruce sold as viola bellies, and this approach will give you a lot more slips to play with than the business of trying to work up a cane-like tube.

Thanks, David!

I was actually wondering what to do with the remainder of the belly, so I’ll use the thin edge of the wedge first as you describe.

Mike

Well, I’m not sure how many slips you’ll be able to get from the thin edge of the belly blank, but there’s probably one in there, at least.

After I posted that note yesterday I began wondering about the various ways it could be misconstrued. The whole purpose of making the blocks I described yesterday is to maximize the number of slips you can get from a given piece of wood. Orientation of the grain structure is pretty important, though, and unless you plan carefully the block of wood you cut from the board so that it represents a stack of slips all with the correct grain orientation, it’s a waste of time.

Belly blanks are typically arranged so that the grain structure of the finished viola top is the same as it would be in a reed, so if the blank came from a reputable dealer used to selling to serious luthiers, you’re half-way home. I have also bought larger chunks of spruce, and when getting out wood to make reeds from, you really have to saw carefully to make sure the grain lines up correctly. In such a case the step of cleaving the wood becomes necessary, so that you can identify the lengthwise “flow” of the grain. As has already been pointed out earlier in this thread, if the grain structure is not truly parallel with the sense of the slip, a gouge may follow the grain in one direction, cutting too deeply too quickly.

Probably like everybody else who takes a whack at making wooden reeds, I came to it with all the baggage of having made cane reeds for years. Only a part of the technology of making cane reeds can be usefully applied to making wooden reeds. It’s tempting to want to handle the wood the same way you’d handle cane, but it’s not necessarily the best way to do things.

I meant to say thinner edge of the belly; the last half inch wouldn’t be good enough. I got the majority of my stock of spruce from my old teacher in Yugoslavia, and he was obsessive about the grain orientation, for precisely the reasons you mention. As I think about it more, turning a tube on the lathe would destroy the exposed grain, and would mean a lot of scraping to correct. So I think I will make a smallish scraper plane with a form tool of the correct cutting diameter and see how that goes with a squared “slip” mounted in a jig.

Mike

I’m pretty sure what you are describing will work, but I get pretty decent results just establishing the outside curvature on a disk sander, freehand. I knock the corners off with a plane, and then take it to the sander.

I hadn’t considered using viola or violin tops as a good source of spruce. Thanks for the suggestion. I wonder what the best spacing is for growth rings on a slip…I think 8/per 11mm was mentioned previously.

I’ve been cutting/splitting rectangular slips that are 1/8" thick, sanding the bottom (concave) side first on a pipe, then shaping the top by hand with a knife before finishing with sandpaper, then cutting the V per usual. Sounds like the right sander works good and saves some labor. I doubt my reeds sound anywhere as good as they should, so will keep experimenting. Must find some good (damaged) viola tops… :slight_smile:

I have not finished one yet, but I have sanded a few slips down to size.

I have been cutting two blade length pieces (~60mm long) from a double thickness (6-7mm) piece
using a japanese pull saw (kerf 0.8mm), across the growth rings. gives pieces 2.5 - 3.0mm thick.
gives me the best chance of balancing the blades.

Thanks Larry for the update on your spruce reeds, it is encouraging to hear
about your success, especially the comparison with cane reeds.

I wonder what the best spacing is for growth rings on a slip…

With the spruce I used (came from packing crates - some looks a lot like
the stuff in Lorenzo’s pic, some has a slight pinkish or brownish tinge
and the growth rings are not as even - some wider some narrower)

I found that earlywood (the pale softer stuff between the darker rings)
much wider than 1mm tended to flex very easily as it got thinner at the edges
of the slip.

With pressure it produced a recurved shape gap at the lips
(like Mick Jagger’s lips, rather than a cat’s eye shape).

The first few slips I cut with the closer spaced rings at the centreline of
the slip. These produced this effect very easily.

The next few I cut with the widest spaced rings along the centreline, the
narrower along the edges. These were not so bad.

I was initially dismayed by this as I thought these reeds would have an
unstable back d; the usual result of weak corners on a reed.

I looked at those slips again today, all are stiffer than when I cut & sanded them
about 6 months ago, and much more evenly so. I can only imagine they have
dried out somewhat, even though the wood was under cover for years before
I cut them.

I am more confident that I might get a working reed from them than
I was yesterday.

I would recommend with spruce using pieces with a ring spacing
of around 1.25mm or less with as even ring spacing as possible.

Leaving them some time to settle before final sanding and tieing
might help. Though I can’t help wondering if the extra flexibility of a
freshly cut piece would help in avoiding splitting when I tie the slips
to the staple.


The spruce I used sanded noticeably quicker than cane.
I cut adjacent pieces ~60mm long ~3mm thick, then trimmed them with a
block plane with a SHARP carbon steel blade to an even thickness of 2.5-2.7mm.
I then glued the pieces together with a drop of superglue on the
centreline near each end so the growth rings matched.

I then trimmed them to width (0.5-1mm oversize) along the grain with a
sharp hobby knife, then cleaned up the edges with the block plane.

I then sanded the outside curve on each side in a concave sanding block
(I used 25mm ID for narrow bore, 28mm ID for concert pitch).
I checked for thickness with a digital caliper, eyeballed for eveness.

I then split the two pieces at the glue joint with the hobby knife,
and sanded the inside curve in each piece on a sanding cylinder.
Again I checked for thickness with a digital caliper, eyeballed for eveness.
The lips ends need more care using this method, not to taper too much near
the inside of the lips.

This is as far as I have got to date.

I will raise the grain using the method I described above,
cut the tails as usual, raise the grain again, final sand, then tie.

After that will come the real tricky stuff.

Best used in conjunction with dental floss. :laughing:

Great to hear your of progress and to read your description, donpiper. I’ve gotten sidetracked, so no video of the new reed yet. Keep up the good work!